|
Safe Share Administrator's Guide
|
|
Safe Share Administrator's Guide
|
All features of Covata technologies are accessed through a Covata user account. The core of these features include the ability to:
A Covata user who has the Safe Share administrator role (also simply known as a 'Safe Share administrator'):
(1) A file object / Secure Object is defined as Covata-encrypted data that has been registered on the Covata Platform, along with the properties associated with this encrypted data. For more information about file objects, see Administering files within the Safe Share Organization Administration section of this guide.
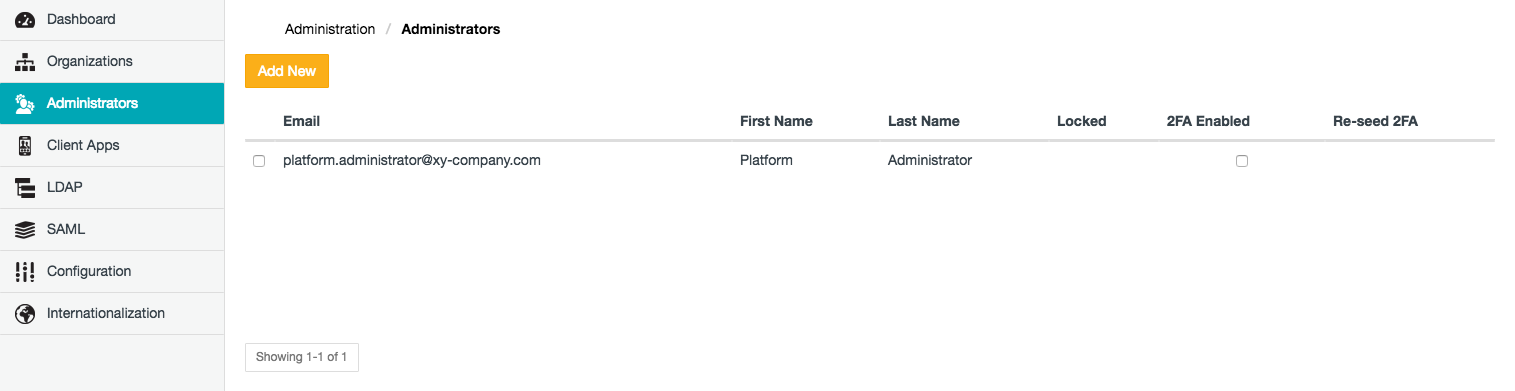
Each Covata user's account is defined by a set of fields described in the table below, of which only the Email field can be specified when a Safe Share administrator's account is added account through Safe Share Administration.
A Safe Share administrator user can configure their own user account's fields when they edit their own account.
Unless stated in the following table, these fields and their values are visible on the Administrators page of Safe Share Administration.
| Field | Description | Required? |
|---|---|---|
The email address that forms part of a user's credentials, which the user requires to authenticate to the Covata Platform. This email address:
| Yes | |
| First Name (2) | A user's first name (e.g. a given name or nickname). This field is only editable through the user's own My Account feature. | No |
| Last Name (2) | A user's last name (e.g. a surname or family name). This field is only editable through the user's own My Account feature. | No |
| Other Name (2) | A user's middle name (e.g. one or more other given names). This field is only visible and editable through the user's own My Account feature. | No |
| Mobile Number (2) | The mobile number of a user. This field is only visible and editable through the user's own My Account feature. Note: This number must include the country calling code and plus (+) sign prefix. | No |
| Default Language (2) | The language preference/settings for a user. Any changes to this field apply immediately to the user interfaces of Safe Share Administration, Safe Share for Web and Organization Administration (if the user has access to these features). Note: This setting overrides the System Default language (defined through the Internationalization page). | No |
| Locked | This field indicates 'Yes' if a Covata user account has been locked as a result of the user mistyping their password more than the maximum number of times configured by a Safe Share administrator. The user themselves will need to unlock this account by following the instructions in their 'account lockout' notification (or by resetting their password via any of the options on the Covata Sign-in page). If a user account is not locked, this field indicates nothing. The values of this non-editable field are only visible on the Administrators and/or Users page. | Not applicable |
| 2FA Enabled (2) and Re-seed 2FA | The 2FA Enabled field's check box for a Safe Share administrator's account is selected if that user has two-factor authentication (2FA) enabled on their account. (This field is also editable through the user's own My Account feature.) If this check box is selected for a Safe Share administrator's account, then the Re-seed button becomes available for that account in the Re-seed 2FA column/field. If a Safe Share administrator account does not have 2FA enabled, this field's check box is cleared for their account. The state of 2FA being enabled or disabled for Safe Share administrator accounts other than your own is only visible on the Administrators page. | No |
(2) While a Safe Share administrator can modify these fields' values for their Covata user account via the My Account feature through Safe Share Administration, the user can also modify these values via equivalent features in Safe Share for Web and other Safe Share products, as well as Organization Administration (assuming they are a member of at least one organization and have the required roles to access these features). A Safe Share administrator becomes a member of an organization when:
Note: Other fields are associated with a Safe Share administrator's user account. However, these fields are either:
- only visible through the 'Users' page of Safe Share Organization Administration, or
- used internally by the Covata Platform and are therefore only exposed to a limited extent through user interfaces (or not exposed at all).
Each Covata user must be assigned a role, which grants the user access to different sets of features available through the Covata Platform and Covata technologies. A Covata user is automatically granted the Safe Share administrator role when their user account is added through Safe Share Administration.
Note: Users can have more than one role (as explained in more detail in the following table):
- A user with the Safe Share administrator role can also be granted the Organization administrator role for any organization.
- A user with either of these administrator roles can also be granted either the Originator or Collaborator role for any organization.
- Likewise, a user with either the Originator or Collaborator role in any organization can have the Safe Share administrator and/or Organization administrator roles.
| Role | Description |
|---|---|
| Safe Share administrator | A Covata user with the Safe Share administrator role can access all administration features of their Covata Platform instance made available through the Safe Share Administration interface. A Covata user's account is granted this role when the user is either:
|
| Other Covata user roles | Covata users with roles other than the Safe Share administrator role can access other features of their organizations' access to the Covata Platform relating to the manipulation and handling of files. For more information about these other Covata user roles, see An organization user's roles in the Safe Share Organization Administration section of this guide.
|
This procedure describes how to add a Safe Share administrator user account to the Covata Platform. This process grants the Covata user the Safe Share administrator role.
To add a Safe Share administrator user to the Covata Platform:
Removing a Covata user account from Safe Share Administration:
Note: Removing a Covata user account from Safe Share Administration does not delete this account from the Covata Platform. If a Covata user (previously removed from Safe Share Administration) is added back again or granted other user roles (which would provide the user with access to features such as file handling and manipulation within their organization/s on the Covata Platform), then the same user account is re-utilized. Any fields that the user had previously edited/customized are retained.
To remove a Covata user account from Safe Share Administration:

This procedure describes how to edit the fields of your (Safe Share administrator) user account on the Covata Platform.
To edit your Safe Share administrator user account:
Only a Covata user with the Local Account Type who has signed in to either Safe Share for Web or Safe Share Administration can change their own password.
Note: The authentication of an LDAP user on the Covata Platform is delegated to its respective LDAP server. If you have an LDAP user account and wish to change its password, you will need to contact your LDAP administrator for details on how to do this (e.g. through the user account on your LDAP server/user directory). See Configuring LDAP for more information.
To change your password:
Terminating your Safe Share administrator account's sessions immediately invalidates all of your currently valid refresh tokens. This action immediately signs you out of your current Safe Share Administration session and then every other Safe Share application with which you have an active session (i.e. once these sessions' access tokens expire). This also includes any other client applications using the Covata Platform's resources with access tokens obtained through your account.
This feature is useful if your Safe Share administrator account is at risk of being compromised - for example, you suspect that you forgot to sign out from a shared computer or you were signed in from a laptop that was either lost or stolen before you signed out.
To terminate your Safe Share administrator account's sessions:
If required, any Safe Share administrator user account (including your own) can be configured with two-factor authentication (2FA) by enabling this feature on such an account.
If 2FA has been enabled on a Covata user account, then in order to successfully sign in through this account (on the Covata Sign-in page), the user is required to enter both their password (i.e. the 1st authentication factor) as well as an authentication code obtained from an authenticator application (aka authenticator app) running on the user's mobile device (i.e. the 2nd authentication factor).
The 2FA feature supports the following mobile devices and authenticator apps:
Notes:
- Before enabling 2FA on a Safe Share administrator account, you may wish to confirm if the user of this account is in possession of any one of these supported mobile devices (above), or notify the user that they will require access to one of these devices to continue signing in through the Covata Sign-in page.
- The URLs to download the appropriate authenticator app for a supported device are available to users when they configure 2FA on their accounts (and are themselves configurable through the Configuration page).
To enable or disable 2FA on your and/or other Safe Share administrator account/s:
Tip: You can also enable or disable 2FA on your own Safe Share administrator account by:
- Ensuring you are signed in to Safe Share Administration.
- Clicking your email address at the top-right of the page and choosing My Account from the drop-down menu.
- In the Security section of the subsequent page, clicking the Enable/Disable button to the right of Two-factor authentication.
While two-factor authentication (2FA) is enabled on a Safe Share administrator's account, the user might lose the ability to generate authentication codes for their 2nd authentication factor (explained in more detail above) due to any of the following reasons:
If one of these scenarios occurs, the Safe Share administrator will no longer be able to sign in through the Covata Sign-in page and they may likely send you or any other Safe Share administrator an email message about one of these scenarios having occurred (via 'contact your administrator' feature on the Authentication code request page as they attempt to sign in through the Covata Sign-in page).
Therefore, to resolve this situation, the Safe Share administrator requires 2FA to be re-configured (aka re-seeded) for their account.
To re-configure 2FA on one or more Safe Share administrator account/s: