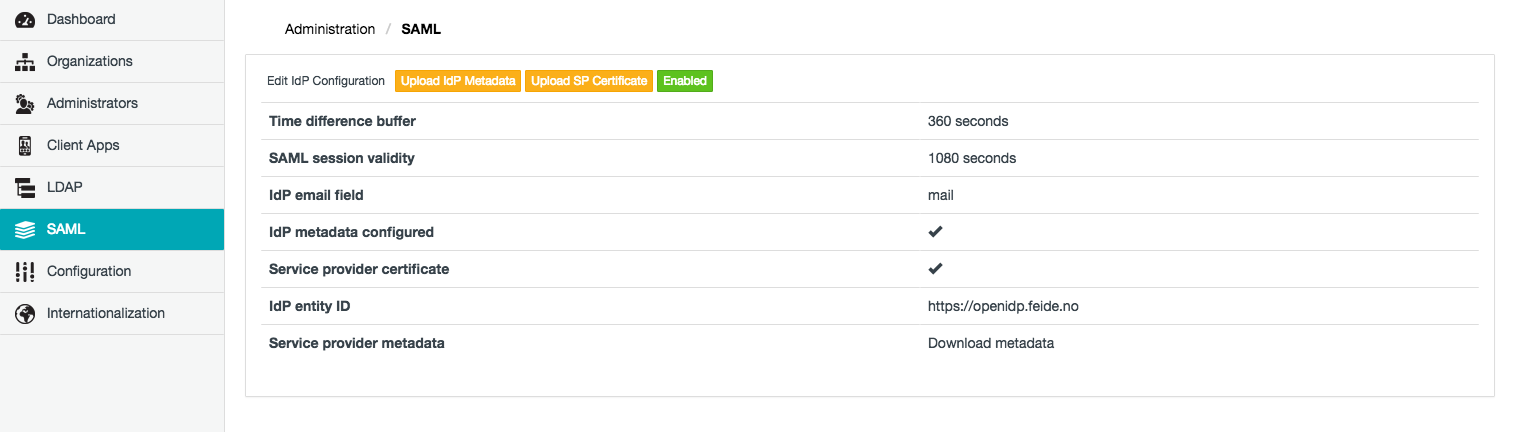
The SAML page of SafeShare Administration (below) allows:
A SafeShare administrator can configure an external Identity Provider (IdP) service (also known as an Identity Assertion Provider) to work with their Cocoon Data Platform instance using Security Assertion Markup Language (SAML) 2.0. (Be aware that the Cocoon Data Platform does not support SAML version 1.0.)
Upon successfully establishing this configuration, the Cocoon Data Platform can then delegate the authentication of any Cocoon Data user to this IdP service through a separate URL, thereby providing the Cocoon Data Platform with single sign-on support. ('Any Cocoon Data user' includes SafeShare administrators as well as users within an organisation, regardless of the organisation/s they belong to.)
Once a user has successfully authenticated to the Cocoon Data Platform's IdP service, the IdP automatically issues a SAML token (representing this user) back to the Cocoon Data Platform, which in turn exchanges this SAML token for an access/refresh token.
Configuring an IdP service on the Cocoon Data Platform has the following requirements:
- An IdP metadata file - this is a SAML-standard XML file that can be obtained from your IdP service and contains configuration information for 3rd party services (such as the Cocoon Data Platform) to interact with the IdP service itself.
- The IdP's email field - Cocoon Data user accounts (on the Cocoon Data Platform) are matched against this user field on the IdP service. Note that this field configuration information may not be part of the IdP metadata file.
- A private key and public X.509 certificate (for the Cocoon Data Platform) - this X.509 certificate is uploaded (either manually or automatically) to the IdP service, which the IdP service then uses to communicate securely with the Cocoon Data Platform.
Note: The IdP metadata file also contains a public X.509 certificate for the IdP service, which the Cocoon Data Platform uses to communicate securely with the IdP service.
Important: The Cocoon Data Platform's Access Service does not support the creation of users on an IdP service. Currently, users on an IdP service will need to be added or updated directly on the IdP itself (for example, through an LDAP server). Be aware that new Cocoon Data user accounts created on the Cocoon Data Platform as a result of adding them either:
will not automatically be added to the IdP service.
Therefore, if a configured IdP service is enabled on the Cocoon Data Platform, then these users can only authenticate through the Cocoon Data Platform's own sign-in URL (as opposed to the Cocoon Data Platform's single sign-on URL that delegates authentication to the IdP service).
If, however, these Cocoon Data users subsequently have an equivalent account (i.e. with the same email address) created directly on the IdP service, then these users can take advantage of the Cocoon Data Platform's single sign-on URL.
Adding an IdP service configuration
To add an IdP service configuration to the Cocoon Data Platform:
- Ensure you are signed in to SafeShare Administration.
- Click the SAML option on the left of the SafeShare Administration interface to open the SAML page.
- Click the Add IdP Configuration button.
- In the Add IdP Configuration dialog box, complete the IdP service configuration fields described in the table (below).
- Click Save and the IdP service configuration will appear on the SAML page.
Notes:
- Once the IdP service has been configured successfully, users can then authenticate to the IdP service by specifying into their browser's URL field, the base URL of your SafeShare for Web instance (which is also the Cocoon Data Platform URL), appended by
/sso (for single sign-on) - e.g:
https://safe-share.xy-company.com/sso
- To allow your Cocoon Data users to sign out from the IdP service, ensure that the IdP service has been configured to allow this and if necessary, that sufficient instructions are provided to these users on how to sign out from the IdP. Otherwise, your users will continue to be signed in to SafeShare for Web whenever they revisit the single sign-on URL (above) and then click the Single Sign-on button.
- It is only possible to add one IdP service configuration, which can then be edited below.
The following table describes all IdP-related fields which are required by the Cocoon Data Platform for a successful connection to an LDAP server/user directory.
| Field | Description |
| Time difference buffer | The maximum permitted time difference (in seconds) between the clocks of the Identity Provider (IdP) service and the Cocoon Data Platform's Access Service.
It is assumed that there is an inherent time difference between the server clocks of the IdP service and the Access Service. Therefore, for the purpose of defining the SAML session validity below (to which this Time difference buffer value is added), define the maximum tolerated time difference between the IdP service and the Access Service. |
| SAML session validity | The SAML session (i.e. assertions issued by the IdP service) will be valid for this number of seconds.
After a user successfully authenticates to the IdP service, the IdP service then creates an assertion which it then typically caches and subsequently issues to all of its service providers utilising single sign-on (one of which is the Cocoon Data Platform's Access Service). This assertion typically contains:
-
The SAML token itself (described above) representing the authenticated user.
-
An issue time indicating when the assertion was created by the IdP service.
At the request of the Access Service, the IdP service sends its (cached) assertion (containing the SAML token) to the Access Service when the Cocoon Data user's access token (and refresh token) expires - see the table on Configuring client applications for more information about access/refresh token validity periods. Therefore, this SAML token effectively overrides the validity periods of access/refresh tokens (since a valid SAML token is exchanged by the Access Service for a fresh access/refresh token).
The total SAML session validity is calculated as this SAML session validity value added to the Time difference buffer value above. If the time difference between the Access Service's current time and the cached assertion's issue time is greater than this total SAML session validity, then the Cocoon Data Platform will reject this assertion (+ its SAML token) from the IdP service. The user will then be forced to re-authenticate to the IdP service (which in turn is forced to create a new assertion with a new issue time).
Notes:
-
Set an optimal SAML session validity period that suits other service providers utilising the configured IdP service:
-
Setting this value too high may increase the risk of a user's session with the Cocoon Data Platform being compromised.
-
Setting this value too low may force users to re-authenticate to the IdP service too frequently, which may impact upon other service providers utilising this IdP service.
-
Be aware that once the Cocoon Data Platform rejects an IdP service's assertion (because the total SAML session validity period has been exceeded) any user sessions with valid access/refresh tokens will remain open, unless the user signs out or their tokens/sessions have been terminated (through SafeShare for Web, Organisation Administration or SafeShare Administration).
|
| IdP email field | The name of the IdP metadata field that corresponds to users' email addresses.
Note: If an IdP metadata file defines its email field in this file, then the value specified in this IdP email field entry overrides the value specified in the IdP metadata file.
|
| IdP metadata file | Indicates whether or not the IdP's metadata file has been uploaded and configured in the Cocoon Data Platform. This file is one of the requirements (described above) for configuring an IdP service on the Cocoon Data Platform.
To upload the IdP metadata file:
-
Ensure you are signed in to SafeShare Administration.
-
Click the SAML option on the left of the SafeShare Administration interface to open the SAML page.
-
Click the Upload IdP Metadata button.
-
In the IdP Metadata dialog box, click Upload IdP metadata XML file.
-
Navigate to and select your IdP metadata (SAML-standard XML) file containing configuration information which the Cocoon Data Platform can use to interact with the IdP service.
-
Click Close to close the IdP Metadata dialog box.
Note: You can remove an uploaded IdP metadata file at any time by opening this IdP Metadata dialog box and clicking Remove IdP configuration (which replaces Upload IdP metadata XML file whenever an IdP metadata file has been successfully uploaded to the Cocoon Data Platform) and then Save to record this removal.
Once an IdP metadata file has been uploaded to the Cocoon Data Platform, a service provider (SP) private key and certificate must be uploaded to the Cocoon Data Platform, which is also one of the requirements (described above) for configuring an IdP service on the Cocoon Data Platform.
To upload the SP private key and certificate:
-
Ensure you have signed in to SafeShare Administration and clicked the SAML option on the left of the SafeShare Administration interface to open the SAML page.
-
Click the Upload SP Certificate button.
-
In the Service Provider Private Key and Certificate dialog box, follow the instructions at the top to generate a private key and certificate, which the Cocoon Data Platform will use to allow the IdP service to communicate securely with the Cocoon Data Platform.
-
Click Save to store the private key and certificate.
-
Click Close to close the Service Provider Private Key and Certificate dialog box.
Notes:
-
You can remove a configured SP private key and certificate at any time by opening this Service Provider Private Key and Certificate dialog box and clicking Remove certificate (which replaces Save whenever an SP private key and certificate have been successfully configured on the Cocoon Data Platform).
-
Once an SP private key and certificate has been successfully configured, you can download a SAML-standard XML file of the SP certificate (to upload manually to the IdP service) by clicking the Download metadata link either on the Service Provider Private Key and Certificate dialog box or directly on the SAML SafeShare Administration page.
|
| IdP enabled? | Indicates whether or not the Cocoon Data Platform is able to work with its configured IdP service (for delegated authentication and single sign-on).
Note: This field is empty until the IdP service configuration has been added to the Cocoon Data Platform.
|
Editing the IdP service configuration
- Ensure you are signed in to SafeShare Administration.
- Click the SAML option on the left of the SafeShare Administration interface to open the SAML page.
- Click the Edit IdP Configuration link.
- In the Edit IdP Configuration dialog box, modify the IdP service configuration fields described in the table (above).
- Click Save and the IdP service configuration will be updated.
Disabling or re-enabling the IdP service configuration
Disabling the IdP service configuration disables single sign-on capabilities to the Cocoon Data Platform (through this configured IdP service).
Therefore, if the IdP service configuration is disabled, users will no longer be able to use the base URL of your SafeShare for Web instance, appended by /sso to sign in to Cocoon Data - e.g:
https://safe-share.xy-company.com/sso
To disable, enable or re-enable the IdP service configuration:
- Ensure you are signed in to SafeShare Administration.
- Click the SAML option on the left of the SafeShare Administration interface to open the SAML page.
- To:
- Disable the IdP service configuration - click the (green) Enabled button until it reads Disabled.
- Enable or re-enable the IdP service configuration - click the (red) Disabled button until it reads Enabled.