All features of Cocoon Data technologies are accessed through a Cocoon Data user account. The core of these features include the ability to:
- Create encrypted files (also known as file objects or Secure Objects (1) ) within an organisation,
- Access and decrypt an encrypted file's data and
- Utilise Cocoon Data SafeShare applications, as well as
- Administer the Cocoon Data Platform (through Organisation Administration, as well as SafeShare Administration).
A Cocoon Data user:
- Has permission to access these features based on their roles.
- Is represented by an account which can be added to, edited (2) within, or removed from an organisation (and re-added again) by an Organisation administrator through the Users page of Organisation Administration.
Notes:
- Users may also be added and updated through an LDAP connection (on its server/user directory). However, the roles of an LDAP user account within an organisation are managed through Organisation Administration.
- Both LDAP connections and the SafeShare administrator role on Cocoon Data user accounts can only be configured/managed through SafeShare Administration. For more information, see to the SafeShare Administrator's Guide.
- (2) A Cocoon Data user account's editable fields fit into two categories:
- non-role-related fields - edited by the user themselves through, for example, SafeShare for Web or other SafeShare products with user account editing features and
- role-related fields (within an organisation) - editable by any user with the Organisation administrator role for that organisation.
(1) A file object / Secure Object is defined by the following:
- Cocoon Data-encrypted data that has been registered on the Cocoon Data Platform.
Note: Cocoon Data-encrypted data is data from a file or stream, which has then been encrypted either:
- The properties associated with this encrypted data. Some of these properties can be determined by the creator/owner of the file.
An organisation user's fields
Each Cocoon Data user's account which is a member of your organisation is defined by a set of fields described in the table below, of which only a subset (Email, Role, Is Organisation Admin? and Plan) requires configuration when an Organisation administrator (of your organisation):
- Adds a new user to your organisation (thereby making this user and their account a member of the organisation) or
- Edits any existing user account within your organisation (with the exception of their Email field).
These subset of fields constitute the 'role-related' fields of a user's account. With the exception of users with the Ad hoc role, any Cocoon Data user can configure the other (i.e. non-role-related) fields (also described in the table below) for their own account when they edit their account through Organisation Administration, SafeShare for Web, as well as other SafeShare products with user account editing features.
Unless stated in the table below, these fields and their values are visible on the Users page of Organisation Administration.
| Field | Description | Required? |
| Email | The email address that forms part of a user's credentials, which the user requires to authenticate to the Cocoon Data Platform. This email address:
-
Defines the user's identity and hence, must be unique amongst all user accounts on the Cocoon Data Platform.
-
Is the email address that the Cocoon Data Platform sends notifications to.
-
Cannot be edited once the account has been created.
| Yes |
| First Name (3) | A user's first name (e.g. a given name or nickname). This field is only editable through the user's own My Account feature. | No |
| Last Name (3) | A user's last name (e.g. a surname or family name). This field is only editable through the user's own My Account feature. | No |
| Other Name (3) | A user's middle name (e.g. one or more other given names). This field is only visible and editable through the user's own My Account feature. | No |
| Mobile Number (3) | The mobile number of a user. This field is only visible and editable through the user's own My Account feature.
Note: This number must include the country calling code and plus (+) sign prefix.
(e.g. +1 234 567 8910 for a US-based number.)
| No |
| Default Language (3) | The language preference/settings for a user. Any changes to this field apply immediately to the interfaces for Organisation Administration, SafeShare for Web and as well as SafeShare Administration (if the user has access to these features). This field is only visible and editable through the user's own My Account feature.
Note: This setting overrides the System Default language (defined through the Internationalisation page, which is configured through SafeShare Administration).
| No |
| Account Type | The user's type of account, which reflects a user account's origin. The Cocoon Data Platform defines the following account types:
-
Local:
-
The user's account was created when an Organisation administrator added the user directly through Organisation Administration.
-
An existing user whose account type was External (below) changes to Local when the user's account (which had the Ad hoc role) was upgraded to the Collaborator role and then an Organisation administrator changed this user account's role to Originator.
-
External - The user account was created implicitly by the Cocoon Data Platform when a Cocoon Data user with the Originator role shared content with a person who did not have a registered Cocoon Data user account at the time. These types of user accounts (with either the Ad hoc role or the Collaborator role if the user upgraded their account from Ad hoc) are considered to have been 'external' in origin (e.g. outside any company or domain).
-
LDAP - The user account was created from an LDAP server/user directory through an LDAP connection. These types of user accounts are created and updated on the Cocoon Data Platform during synchronisation events with their respective LDAP servers. For more information about configuring LDAP connections, see Configuring LDAP in the SafeShare Administrator's Guide.
Note: The value of this field is automatically determined by the Cocoon Data Platform when the user account is created and its value is not editable. | Not applicable |
| Role | The roles granted to a user within an organisation, each of which define the core features of Cocoon Data technologies (described above) that this user can access. See An organisation user's roles for more information.
The Organisation administrator role is granted by selecting the Is Organisation Admin? check box below.
Notes:
-
This Role field is not mandatory when adding or editing a Cocoon Data user with the Organisation administrator role only.
-
Other than the Organisation administrator role, a user's other roles within an organisation can only be upgraded - for instance, the Ad hoc role can only be upgraded to either the Collaborator or Originator role, and the Collaborator role to the Originator role.
-
This field's value can be empty (i.e. 'No Role') because a user account may only have the Organisation administrator role specified. However, once this Role field's value has been specified, it cannot be cleared.
| Yes
(if Is Organisation Admin? below is not selected) |
| Plan | The plan (defining a storage quota) assigned to a user, which limits the amount of storage space the user can access when uploading data to the Cocoon Data Platform's Content Service through a Cocoon Data SafeShare product or a client application that utilises the Cocoon Data Platform's API.
Notes:
-
This field is only accessible if the Originator role is specified (below).
-
At least one plan must be added to the organisation (i.e. the initial default plan) before the Originator role can be applied to any user added to the organisation. See Managing users' storage quotas through plans for more information.
-
When a Cocoon Data user with the Originator role is added to an organisation, or an existing user's role is upgraded to Originator, the default plan is automatically selected (or this plan is set on users' accounts if the accounts were added either in bulk from a CSV file or automatically from an LDAP server/user directory).
-
If an existing user's storage space already exceeds the quota defined by a plan, which is then applied to the user's account, then the user will no longer be able to upload any further data to storage until either:
-
The user removes a sufficient amount of their own content to lower their utilised storage space (below their plan's quota).
-
A plan defining a larger quota than their currently utilised storage space is applied to the user's account.
| Yes
(for a Cocoon Data user with the Originator role; otherwise, not applicable) |
| Usage | The amount of storage space that the user's account currently consumes (in your organisation). | Not applicable |
Org Admin /
Is Organisation Admin? | On the Users page, this field (labeled Org Admin) indicates 'Yes' if a user has the Organisation administrator role - otherwise, 'No'.
When adding a user account to an organisation or editing the account's role-related fields, selecting the check box of this field (labeled Is Organisation Admin? on the Add New/Edit User dialog box) grants the user within an organisation the Organisation administrator role.
Note: This option is not available when editing the accounts of the currently logged in user, or users who have an External Account Type or the Ad hoc role.
| No |
| Locked | This field indicates 'Yes' if a Cocoon Data user account has been locked as a result of the user mistyping their password more than the maximum number of times configured by a SafeShare administrator (of the Cocoon Data Platform instance). The user themselves will need to unlock this account by following the instructions in their 'account lockout' notification (or by resetting their password via any of the options on the Cocoon Data Sign-in page).
If a user account is not locked, this field indicates nothing. The values of this non-editable field are only visible on the Users page. | Not applicable |
MFA Enabled (3) and
Re-seed | The MFA Enabled field indicates 'Yes' if a Cocoon Data user account has multi-factor authentication (MFA) enabled. (This field is editable through the user's own My Account feature.)
If this field indicates 'Yes', then the Re-seed button becomes available in the Re-seed column/field.
If a user account does not have MFA enabled, this field indicates No. The values of this non-editable field (for user accounts other than your own) is only visible on the Users page. | Not applicable |
(3) While an Organisation administrator can modify these fields' values for their Cocoon Data user account via the My Account feature through Organisation Administration, the user can also modify these values via equivalent features in SafeShare for Web, other SafeShare products with user account editing features, as well as SafeShare Administration (if the user has access to these features).
Note: Other fields are associated with a Cocoon Data user's account. However, these fields are used internally by the Cocoon Data Platform and are therefore only exposed to a limited extent through user interfaces (or not exposed at all).
An organisation user's roles
Each Cocoon Data user must be assigned a role, which grants the user access to different sets of features available through Cocoon Data technologies. A Cocoon Data user's roles within an organisation can be modified by editing their user account.
Note: Users can have more than one role. Regardless of organisation:
- A user with the Organisation administrator (and/or SafeShare administrator) role can also be granted either the Originator or Collaborator role.
- Likewise, a user with either the Originator or Collaborator role can also be granted the Organisation administrator role and/or the SafeShare administrator role (of their Cocoon Data Platform instance).
| Role | Description |
| Originator | A Cocoon Data user with the Originator role in a given organisation can use Cocoon Data technologies to do the following (within the scope of their organisation):
-
Create their own encrypted files and folders (collectively known as 'items') utilising:
-
Any Cocoon Data SafeShare application, or
-
Another client application that interacts with the Cocoon Data Platform's API.
-
Securely store encrypted files in storage managed by the Cocoon Data Platform's Content Service. The amount of storage space available to the user depends on their plan. Since storage space is associated with a Cocoon Data user (who has the Originator role), then any encrypted files stored within this space become owned by this user.
Note: Depending on the formats of these encrypted files, read-only views may also be generated for these files (which consumes a comparatively small amount of storage space) for presentation in SafeShare's content viewer.
-
Share their secured items with other Cocoon Data users who have the Originator, Collaborator or Ad hoc role, including other people who have not yet been registered as a Cocoon Data user. Also determine which of these Cocoon Data users and other people have permissions to View, Download, Upload (for folders only), Modify or Manage these items that have been shared with them.
Notes:
-
Cocoon Data users who have been shared an item are known as collaborators on the item. This term should not be confused with Cocoon Data users who have the Collaborator role (below).
-
These processes are conducted through the (Safe) Share dialog box of any Cocoon Data SafeShare application, or when setting collaborators on a file or folder through a client application utilising the Cocoon Data Platform's API.
-
Specify other access controls on their files, such as:
-
The date and time from which collaborators can begin accessing a file's content as well as the date and time when this access ceases.
-
A label that defines which clearances of Cocoon Data users a file can be shared with.
These processes are conducted through either the (Safe) Share dialog box of any Cocoon Data SafeShare application, or when setting collaborators on a file object through a client application utilising the Cocoon Data Platform's API.
A Cocoon Data user's account can be granted this role by an Organisation administrator when this administrator either adds the user's account to their organisation or edits this account (which could also be their own) within their organisation (4) .
Users with the Originator role can also use Cocoon Data SafeShare applications (or applications that interact with the Cocoon Data Platform's API) to:
-
Manage their list of contacts (e.g. Cocoon Data users with whom they frequently share secured items),
-
View/access/update their account details,
-
Manage their email notifications and
-
Revoke the right that client applications were initially granted (by the user themselves) to access the Cocoon Data Platform's resources through their user account.
Notes:
-
A Cocoon Data user with the Originator role has access to all features of Cocoon Data technologies which are available to a user with the Collaborator role.
-
(4) All Cocoon Data users which have been added through a connection to an LDAP server automatically have the Originator role. For more information about configuring LDAP connections, see Configuring LDAP in the SafeShare Administrator's Guide.
|
| Collaborator | A Cocoon Data user with the Collaborator role in a given organisation can use Cocoon Data technologies to do the following (within the scope of their organisation):
-
As a collaborator on a file or folder owned by another Cocoon Data user (see Originator role description above for more information), access and decrypt the data of an encrypted file (or files within the folder), utilising:
-
Any Cocoon Data SafeShare application, or
-
Another client application that interacts with the Cocoon Data Platform's API.
-
As a collaborator with Upload, Modify or Manage permissions on a folder owned by another Cocoon Data user, create encrypted files as well as subfolders inside this other user's folder, utilising:
-
Any Cocoon Data SafeShare application, or
-
Another client application that interacts with the Cocoon Data Platform's API.
-
As a collaborator with Manage permissions on an item owned by another Cocoon Data user, share this item (and specify other optional access controls on the item), similar to users with the Originator role on their own items (above), utilising:
-
Any Cocoon Data SafeShare application, or
-
Another client application that interacts with the Cocoon Data Platform's API.
A Cocoon Data user's account can be granted this role by an Organisation administrator when this administrator either adds the user's account to their organisation or edits this account (which could also be their own) within their organisation (5) .
Users with the Collaborator role can also use Cocoon Data SafeShare applications (or applications that interact with the Cocoon Data Platform's API) to:
-
Manage their list of contacts (e.g. Cocoon Data users with whom they frequently share secured items),
-
View/access/update their account details,
-
Manage their email notifications and
-
Revoke the right that client applications were initially granted (by the user themselves) to access the Cocoon Data Platform's resources through their user account.
Notes:
-
If a Cocoon Data user (who originally had the Ad hoc role) sets their password and signs in to upgrade their account (which changes their account's role to Collaborator), then the Account Type still remains External. However, once an Organisation administrator grants this user's account the Originator role, then the Account Type switches to Local.
-
(5) A Cocoon Data user account with the Collaborator role is added to an organisation automatically if another user with the Originator role in this organisation shares an item with this added user through either a Cocoon Data SafeShare application or another client application that interacts with the Cocoon Data Platform's API. In such instances, this added user's account would have already been registered on the Cocoon Data Platform and if applicable, upgraded from the Ad hoc role. This process is similar to how users with the Ad hoc role are added to an organisation.
|
| Ad hoc | A Cocoon Data user with the Ad hoc role (also simply known as an 'Ad hoc user') is an account which is automatically created by the Cocoon Data Platform and added to an organisation when:
-
A user with the Originator role in that organisation shares their file or folder with someone (via their email address), through either a Cocoon Data SafeShare application or another client application that interacts with the Cocoon Data Platform's API
and
-
This email address does not match that of any existing Cocoon Data user account registered on the Cocoon Data Platform (e.g. as a member of another organisation).
Users with this role are typically people outside a company or domain, who (once their account is added) can use Cocoon Data technologies to perform the same activities on items as users with the Collaborator role within the scope of this organisation.
Once an Ad hoc user account is added to an organisation, this user's account is subsequently utilised whenever they are shared items by another user (with the Originator role) in this or any other organisation.
Ad hoc user accounts do not have a dedicated password. However, once an Ad hoc user is shared an item by another user, an email notification is sent to the Ad hoc user's email address. This notification leads this user to obtain a one-time access link via a subsequent email notification, which in turn, leads the user to set a password before the user is able to access their shared item/s through SafeShare for Web.
Notes:
-
Once a Cocoon Data user with the Ad hoc role has set their password and signed in to SafeShare for Web, the user's role is upgraded to Collaborator.
-
The Ad hoc role cannot be specified when an Organisation administrator adds a user to their organisation. However, if an Organisation administrator removes a user with the Ad hoc role from their organisation (i.e. before the user has had the chance to set their password and sign in) and then another user with the Originator role in this or any other organisation shares an item with this Ad hoc user, then this Cocoon Data user's account is automatically re-added to the organisation with the Ad hoc role.
-
An Ad hoc user account will not be created and added to an organisation if either the organisation's:
|
| Organisation administrator | A Cocoon Data user with the Organisation administrator role (also simply known as an 'Organisation administrator') can access all administration features of their organisation on the Cocoon Data Platform made available through the Organisation Administration interface.
Notes:
-
Other than the ability to administer their organisation's access to the the Cocoon Data Platform's resources, a Cocoon Data user whose account only has the Organisation administrator role does not have access to features of Cocoon Data technologies available to users with the Originator or Collaborator/Ad hoc roles. Organisation administrators who are likely to use Cocoon Data technologies within their organisation for purposes other than to administer it should grant themselves the Originator or Collaborator role as required.
-
Only Organisation administrators within an organisation can add the Organisation administrator role for their organisation to any other Cocoon Data user.
-
A Cocoon Data user whose account only has the Organisation administrator role for an organisation is automatically granted the Collaborator role for this organisation if another user with the Originator role in this organisation shares an item with this Organisation administrator, through either a Cocoon Data SafeShare application or another client application that interacts with the Cocoon Data Platform's API.
|
If you would like users in your organisation to utilise client applications (other than Cocoon Data SafeShare applications) that interact with your organisation through the Cocoon Data Platform's API, request that a SafeShare administrator of your Cocoon Data Platform instance configure these client applications for you (since only SafeShare administrators can perform these configurations). For more information about configuring client applications, see Configuring client applications in the SafeShare Administrator's Guide.
An organisation user's activities
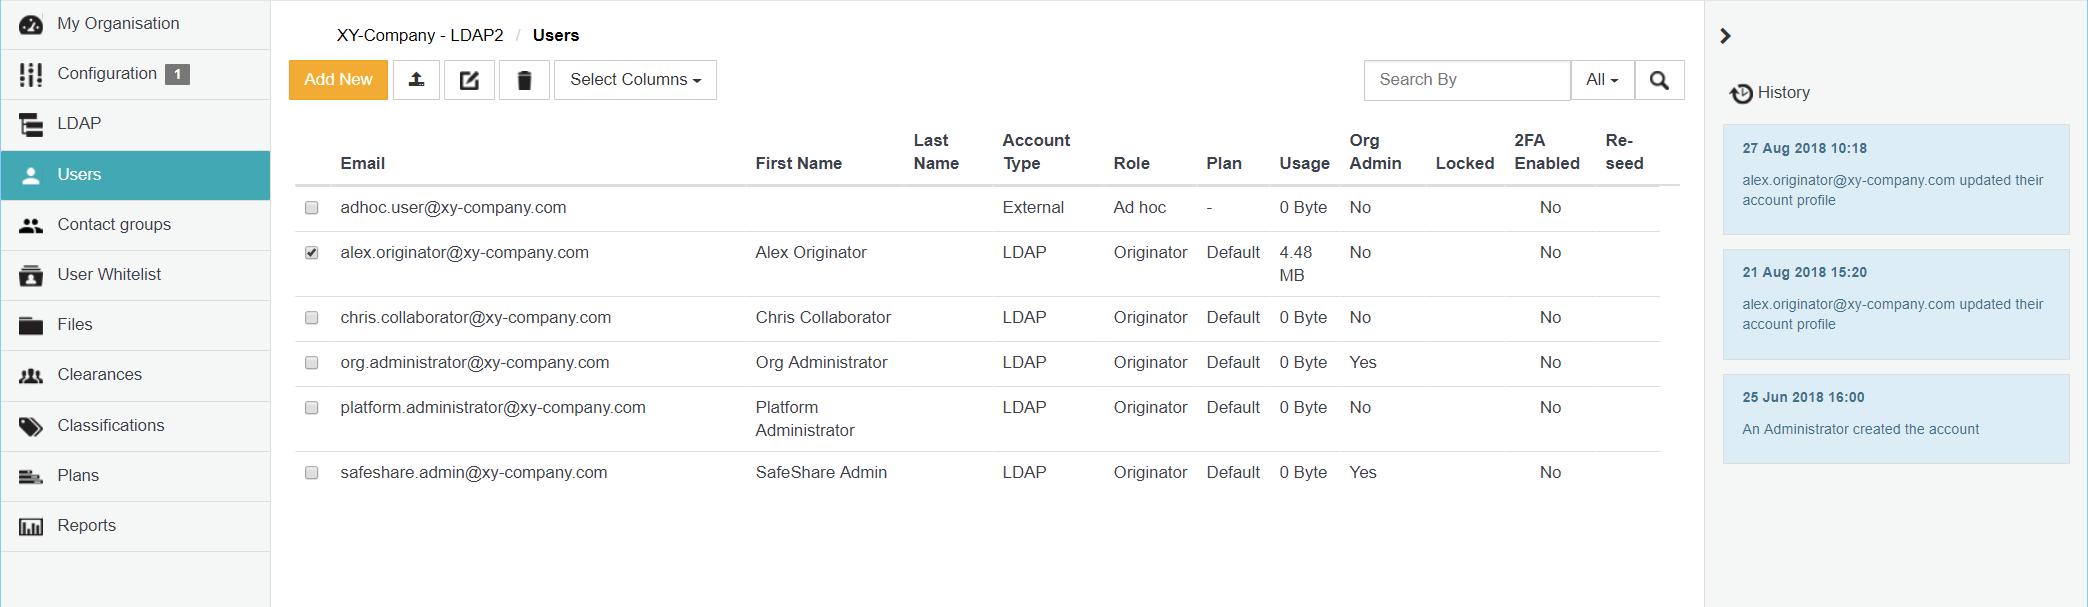
Upon selecting a Cocoon Data user account on the Users page, a history of activities performed by this user on their own account (or by an Organisation administrator, including a SafeShare administrator if applicable, on the user's account) is shown in reverse chronological order in the History panel on the right of the page.
If the administrator is not a member of the organisation, then 'An Administrator' is shown instead of the Cocoon Data user's name.
The History panel on the right can be collapsed and expanded by clicking the respective > / < icon at the top of this panel. The types of activities recorded on the user's account include the user's own changes to their account's:
- details,
- password,
- multi-factor authentication settings, or
- other settings.
Also recorded are changes to the user's account settings by an Organisation administrator, as well as the creation of an account (or its addition to an organisation) by an administrator. Be aware that sign-in and sign-out activities are not recorded by this feature.
Adding an organisation user account
This procedure describes how to add a Cocoon Data user account to your organisation on the Cocoon Data Platform. A Cocoon Data user whose account has been added to an organisation is a member of that organisation.
Note: Cocoon Data user accounts can also be added to an organisation:
To add a user to your organisation on the Cocoon Data Platform:
- Ensure you are signed in to Organisation Administration.
- Click the Users option on the left of the Organisation Administration interface to open the Users page.
- Click the Add New button.
- In the Add New User dialog box, complete the required user's fields (described in detail above).
Tip: See An organisation user's roles for more information about the role(s) to specify for this user.
- Click Save and the Cocoon Data user will appear as a new entry on the Users page.
Notes:
- If the user's email address has not yet been registered on the Cocoon Data Platform, a new Cocoon Data user account is automatically created for them. The user's:
- Cocoon Data user account will have the Local Account Type, which is indicated on this Users page of Organisation Administration and
- email address is sent an 'account created' notification, with instructions to the user on how to sign in to SafeShare for Web (applicable to most users added to your organisation whose accounts are created in this manner). The initial sign-in process usually requires the Cocoon Data user to reset their password immediately after signing in.
- If this user already has a user account on the Cocoon Data Platform, their email address is sent an 'account updated' notification, informing the user that their Cocoon Data user account has been added as a member of your organisation. The user can then access SafeShare for Web (as well as other SafeShare products) for your organisation.
- If the account added has the Organisation administrator role only, then the Organisation Administration interface is displayed as soon as the user of this account signs in.
- If the account has any combination of the Originator, Collaborator or SafeShare administrator role in addition to the Organisation administrator role, then the user should refer to Signing in to Organisation Administration for more information about accessing the Organisation Administration interface.
Adding organisation user accounts in bulk (from CSV)
Cocoon Data user accounts can be added to your organisation in bulk (in a single action) by importing their details from a CSV file.
CSV file preparation and requirements
- The Cocoon Data Platform's CSV user import feature assumes that each line of the CSV file (except the first mandatory 'header' line) represents field data for a specific user. (The first line will not be imported as a user.)
- The order of field data for each user in the CSV file (as should be defined by the header line) must be:
Email, Role
Notes:
- White space around each separating comma is not required.
- You can actually specify any field names/labels for the header line of your CSV file. However, the order of field data for each user (in subsequent lines of your CSV file) must comply with the order above (i.e. email address followed by role).
- For a user to be successfully imported from a CSV file, the following conditions must be met:
-
Values for both of these fields are mandatory.
-
The
Email field's value must comply with a valid email format.
-
The
Role field value can only be exactly Originator or Collaborator (i.e. an initial capital letter followed by lower-case letters). It is not possible to import Cocoon Data users with the Ad hoc, Organisation administrator or SafeShare administrator roles.
-
If a user's email address appears more than once in the CSV file and the conditions above for each of these entries are still met, then only user data from the first of these multiple entries is imported (and the remainder are reported as duplicates).
If the CSV user import feature encounters a validation problem when parsing a line (due to any of the conditions listed above failing), then that user is not imported. Like duplicate entries, each user for which a validation problem occurred is also reported.
To add users to your organisation in bulk from a CSV file:
- Ensure you are signed in to Organisation Administration.
- Click the Users option on the left of the Organisation Administration interface to open the Users page.
- Click the
(Import from CSV) button.
- In the Import from CSV dialog box, click the Choose a file button.
- Navigate to and select your CSV file containing the users to be imported to the Cocoon Data Platform.
The CSV import feature proceeds to import your users. Upon completion, the number of successfully imported Cocoon Data users are reported, along with each unique invalid data value (if any were encountered).
- Click Close to close the Import from CSV dialog box. Users imported with the Originator role are automatically assigned the default plan.
Notes:
- If any of these users' email addresses have not yet been registered on the Cocoon Data Platform, a new Cocoon Data user account is automatically created for each of them. For each of these users:
- their Cocoon Data user account will have the Local Account Type, which is indicated on this Users page of Organisation Administration and
- their email address is sent an 'account created' notification, with instructions to the user on how to sign in to SafeShare for Web. The initial sign-in process usually requires the Cocoon Data user to reset their password immediately after signing in.
- For any of these users who already have a user account on the Cocoon Data Platform, their email address is sent an 'account updated' notification, informing the user that their Cocoon Data user account has been added as a member of your organisation. The user can then access SafeShare for Web (as well as other SafeShare products) for your organisation.
Notes:
- The number of users that can be imported from a single CSV file is restricted by the response timeout of the Cocoon Data Platform's load balancer. We found that a response timeout of 60 seconds on our load balancers allowed the import of up to 1000 users from a CSV file. If you have your own on-site deployment of the Cocoon Data Platform, you may wish to tweak the response timeout of your load balancers to allow the import of more users from a CSV file.
- When a new Local user account is created, the Cocoon Data Platform automatically generates a password which is emailed to that user. To maximise security, the password (once created), is hashed 64,000 times using the PBKDF2 algorithm before being stored by the Cocoon Data Platform. Since this process has an overhead of approximately 300 milliseconds and the number of users imported by the CSV user import feature could be extensive, then the auto-generated passwords of CSV-imported Cocoon Data users are only hashed 100 times using PBKDF2 (before being stored by the Cocoon Data Platform). Hence, if you are concerned about the security of these stored passwords, you may wish to request that a SafeShare administrator for your Cocoon Data Platform instance reduces the Temporary password expiry time in hours configuration option through SafeShare Administration. For more information, refer to Configuring SafeShare Administration properties in the SafeShare Administrator's Guide.
Finding user accounts within your organisation
As more Cocoon Data users are added to your organisation, it can become difficult to locate specific users through the Users page of Organisation Administration. The Users page therefore offers features to help you locate specific user accounts within your organisation more rapidly.
To find specific user accounts within your organisation:
- Ensure you are signed in to Organisation Administration.
- Click the Users option on the left of the Organisation Administration interface to open the Users page.
- Use either of the following features to find a specific user account (or subset of these accounts):
- Filter user accounts - In the Search By box (right of the Users page), begin typing a series of characters contained in any of the users' Email, First Name, Last Name, Role or (Organisation) Admin fields, followed by the 'Enter/Return' key. This filters the list of users within your organisation to those whose Email, First Name, Last Name, Role or (Organisation) Admin (i.e. 'yes' or 'no') contains the subset of characters entered into the Search By box.
By default, the Email, First Name, Last Name, Role or (Organisation) Admin fields are used for filtering (i.e. All), although filtering can be restricted to just one of these fields using the adjacent drop-down.
- Navigate to specific user accounts - If available, use the page navigation buttons (lower-right of the Users page).
Tip: You can also sort user accounts on the Users page by clicking the linked name (in the column header) of the field by which you would like to sort your users:
- Clicking a linked field name multiple times toggles between sorting the users (according to that field) in ascending and descending order.
- To revert back to the natural ordering of users in the list, simply refresh the page.
Editing an organisation user account
This procedure describes how to edit the role-related fields (i.e. Role, Is Organisation Admin? and Plan) of any existing Cocoon Data user account within your organisation.
Note: To edit the non-role-related fields of your own Cocoon Data user account, see Editing your Organisation administrator account below.
To edit the role-related fields of a user account in your organisation:
- Ensure you are signed in to Organisation Administration.
- Click the Users option on the left of the Organisation Administration interface to open the Users page.
- Find the user account whose role-related fields are to be edited and select their check box on the left.
- Click the
(Edit User) button which appears at the top.
- In the Edit User dialog box, update the user's relevant role-related fields (described in detail above).
- Click Save and the user's fields will be updated.
Notes: The Email address of all users on the Cocoon Data Platform is unique and since this field may be used for auditing purposes, no Cocoon Data user account's email address field can be edited. However:
- To update the email address of a Cocoon Data user with the Local or External Account Type:
- Add a new user account (with the user's new email address but the same role-related field values) to your organisation.
- Remove the user's old account.
Note: If this user had the Originator role, then while removing the user's old account, choose the option to transfer ownership of this old account's items (i.e. all file objects and folders, including their content) to the new user account created in the previous step.
- To update the email address of a Cocoon Data user with the LDAP Account Type:
- Request that your LDAP server/user directory administrator update and provide you with the user's new email address.
- Add this user's account (with this new email address but the same role-related field values) to your organisation.
- Remove the user's old account.
Note: If this user had the Originator role, then while removing the user's old account, choose the option to transfer ownership of this old account's items (i.e. all file objects and folders, including their content) to the new user account created by the LDAP server/user directory administrator and you then added to your organisation, in the previous steps.
Removing a user account from your organisation
Removing a Cocoon Data user account removes the user from your organisation, with the option to either:
- transfer all file objects and folders (including their content) currently owned by this user to that of another Cocoon Data user, or
- permanently delete all of this user's content.
Notes:
- The Cocoon Data Platform's auditing reports and log files still retain a record of activities conducted by Cocoon Data users whose accounts have been removed from an organisation.
- An Organisation administrator can remove any user account from their organisation except the user account with which they are currently signed in to Organisation Administration.
- Removing a Cocoon Data user account from your organisation (through Organisation Administration) does not delete this account from the Cocoon Data Platform. If a Cocoon Data user (previously removed from your organisation) is subsequently added to your organisation again or added to another organisation, then the same user account is re-utilised. Any fields that the user had previously edited/customised (i.e. through Organisation Administration, SafeShare Administration, SafeShare for Web, as well as other SafeShare products with user account editing features) are retained.
To remove a Cocoon Data user account from your organisation:
- Ensure you are signed in to Organisation Administration.
- Click the Users option on the left of the Organisation Administration interface to open the Users page.
- Find the user whose account is to be removed from your organisation and select their check box on the left.
- Click the
(Remove User) button to open the Remove User... dialog box.
Note: If this Cocoon Data user has the Originator role and has one or more items (i.e. files and/or folders), then the Remove User... dialog box indicates the number of items this user owns and requests whether or not you would like to transfer these items to another user's account (which also with the Originator role).
- If you wish transfer these items to another user's account:
- Select the Transfer all content to another Originator check box.
- Select the user (i.e. their email address from the list) to transfer the items to:
- Only users with the Originator role are listed.
- This list can be filtered typing a series of characters contained in the users' email addresses.
- If you do not wish to transfer these items and would prefer them to be permanently deleted, then leave the Transfer all content to another Originator check box cleared.
- After confirming your decision to either transfer or permanently delete the user's items, click Remove.
- If you chose to transfer these items to another user's account, then:
- the user's account is removed from your organisation and
- the items that the removed user owned are transferred to a folder at the root level of the recipient user's storage area. The name of this folder is the removed user's email address along with the date the transfer occurred.
- If you chose not to transfer these items, then:
- the user's account is removed from your organisation and
- the encrypted files and folders that belonged to this user are permanently deleted.
Note: If a Cocoon Data user account of the LDAP Account Type is removed from your organisation (using this procedure above), then the user's account is removed from your organisation although the account is not disabled on the LDAP server/user directory itself. When the Cocoon Data Platform subsequently synchronises with the LDAP server, the account will not reappear within your organisation (amongst the list of current Cocoon Data user members) unless an Organisation administrator manually adds this user to your organisation again.
Editing your Organisation administrator account
This procedure describes how to edit the non-role-related fields of your (Organisation administrator) user account on the Cocoon Data Platform.
Notes:
- To edit the role-related fields (i.e. Role, Is Organisation Admin? and Plan) of any Cocoon Data user account within your organisation (including your own), see Editing an organisation user account above.
- The non-role-related fields of LDAP user accounts can only be edited through these accounts' respective LDAP server/user directory. These user accounts' fields are updated on the Cocoon Data Platform during synchronisation events with the LDAP server/s. For more information about adding LDAP users, see Configuring LDAP in the SafeShare Administrator's Guide.
To edit the non-role-related fields of your Organisation administrator account:
- Ensure you are signed in to Organisation Administration.
- Click your email address at the top-right of the page and choose My Account from the drop-down menu.
- In the Account Details section of the subsequent page, update any of your user account's fields (described in detail above).
Note: The Email addresses of all Cocoon Data user accounts on the Cocoon Data Platform are unique and since this field may be used for auditing purposes, no Cocoon Data user account's email address field can be edited. However, to update the email address of your user account and/or those of other users within your organisation, then for each of these users:
- Add a new Cocoon Data user account (with their new email address but the same role-related field values) to your organisation. For each account whose Account Type is LDAP, obtain the new email address from your LDAP server/user directory administrator in order to add their account (with this email address) to your organisation.
- Remove the user's old Cocoon Data user account. For each Cocoon Data user account (with the Originator role), transfer the user's content from their old account to their new user account.
- Click Save and your user account's fields will be updated.
Notes: If you cannot edit your user account's fields, then your Account Type is likely to be LDAP. The fields of LDAP user accounts are edited through their respective LDAP servers' user directories and are updated on the Cocoon Data Platform during synchronisation events with these user directories.
Changing your Organisation administrator account password
Only a Cocoon Data user with the Local Account Type who has signed in to either SafeShare for Web or Organisation Administration can change their own password.
Note: The authentication of a Cocoon Data user on the Cocoon Data Platform whose Account Type is LDAP is delegated to its respective LDAP server. If you have such a Cocoon Data user account and wish to change its password, you will need to contact your LDAP administrator for details on how to do this (e.g. through the user account on your LDAP server/user directory). For more information about LDAP user accounts, see Configuring LDAP in the SafeShare Administrator's Guide.
To change your Organisation administrator account's password:
- Ensure you are signed in to Organisation Administration.
- Click your email address at the top-right of the page and choose My Account from the drop-down menu.
- In the Security section of the subsequent page, click the Change password button.
- On the Set your password... page, specify your current password and then your new password twice (i.e. once more to verify it).
- Click the Change button and your Cocoon Data user account's password is now changed.
Terminating your Organisation administrator account's sessions
Terminating your Organisation administrator account's sessions immediately invalidates all of your currently valid refresh tokens. This action immediately signs you out of your current Organisation Administration session and then every other SafeShare application with which you have an active session (i.e. once these sessions' access tokens expire). This also includes any other client applications using the Cocoon Data Platform's resources with access tokens obtained through your account.
This feature is useful if your Organisation administrator account is at risk of being compromised - for example, you suspect that you forgot to sign out from a shared computer or you were signed in from a laptop that was either lost or stolen before you signed out.
To terminate your Organisation administrator account's sessions:
- Ensure you are signed in to Organisation Administration.
- Click your email address at the top-right of the page and choose My Account from the drop-down menu.
- In the Security section of the subsequent page, click the Terminate button.
Your current Organisation Administration session with the Cocoon Data Platform is terminated immediately, which also results in you being signed out from your current session. You will need to sign in again to gain access to SafeShare for Web, as well as your Cocoon Data Platform's resources.
Note: Every other SafeShare application with which you have an active session (including any other client applications using the Cocoon Data Platform's resources with access tokens obtained through your account), will be terminated once these sessions' access tokens expire.
Enabling or disabling MFA on Organisation user accounts
If required, an Organisation administrator can configure multi-factor authentication (MFA) by enabling this feature on:
- their own Cocoon Data user account, or
- all Cocoon Data user accounts which are currently members of their organisation (if a SafeShare administrator has allowed this on the Cocoon Data Platform).
If MFA has been enabled on a Cocoon Data user account, the user is then required to enter both their password (i.e. the 1st authentication factor), as well as an authentication code obtained from an authenticator application (aka authenticator app) running on their mobile device (i.e. the 2nd authentication factor), in order for the user to successfully sign in through this account on the Cocoon Data Sign-in page.
The MFA feature supports the following mobile devices and authenticator apps:
- Android-based devices running the Google Authenticator app,
- Apple's iPhone, iPad or iPod Touch devices running the Google Authenticator app, or
- Microsoft Windows-based devices running Microsoft's authenticator app.
Notes:
- Before enabling MFA on any Cocoon Data user account, you may wish to verify if the users of these accounts are in possession of any one of these supported mobile devices (above), or notify these users that they will require access to one of these devices to continue signing in through the Cocoon Data Sign-in page.
- Take caution before deciding to enable MFA for all Cocoon Data users in your organisation. If any members of your organisation (including yourself) are not prepared to configure MFA on their account, they may be unable to sign in successfully through the Cocoon Data Sign-in page, thereby preventing these users' access to:
- all organisations on the Cocoon Data Platform for which these users are members and/or
- Organisation Administration for all organisations of which these users are Organisation administrators.
- The URLs to download the appropriate authenticator app for a supported device are available to users when they configure MFA on their accounts (and are themselves configurable by SafeShare administrators). For more information, see Configuring SafeShare Administration properties of the SafeShare Administrator's Guide.
To enable or disable MFA on your Organisation administrator account (or all Cocoon Data user accounts in your organisation):
- Ensure you are signed in to Organisation Administration.
- For your Organisation administrator account only:
-
To enable MFA on it:
-
Click your email address at the top-right of the page and choose My Account from the drop-down menu.
-
In the Security section of the subsequent page, click the Enable button (to the right of 'Multi-factor authentication ( disabled )').
Your Organisation administrator account's email address is sent a notification informing you that MFA has been enabled on your account, along with a time-limited link, with step-by-step instructions for configuring MFA (6) .
-
To disable MFA on it:
-
Click your email address at the top-right of the page and choose My Account from the drop-down menu.
-
In the Security section of the subsequent page, click the Disable button (to the right of 'Multi-factor authentication ( enabled )').
Your Organisation administrator account's email address is sent a notification informing you that MFA has been disabled on your account.
For all Cocoon Data user accounts in your organisation:
- To enable MFA on these accounts:
- Click the Configuration option on the left of the Organisation Administration interface to open the Configuration page.
- Click the Edit link to the right of the property 'Enforce multi-factor authentication for organisation members.'
- In the Edit Config Property dialog box, select the Property Value check box.
Tip: For more information about configuring this and other Organisation Administration properties, see Configuring Organisation Administration properties.
- Click Save and all Cocoon Data user accounts within your organisation (including your own) will have MFA enabled on their accounts.
Each Cocoon Data user within your organisation is sent an email notification informing them that MFA has been enabled for their account. This email message contains a time-limited link, with step-by-step instructions for configuring MFA (6) .
- To disable MFA on these accounts:
- Click the Configuration option on the left of the Organisation Administration interface to open the Configuration page.
- Click the Edit link to the right of the property 'Enforce multi-factor authentication for organisation members.'
- In the Edit Config Property dialog box, clear the Property Value check box.
- Click Save and then only each user themselves can disable MFA on their own account (once they have signed in).
(6) These step-by-step instructions for configuring MFA guide the user on how to:
- Configure their mobile device with the appropriate authenticator app.
- Configure the authenticator app (once installed) with their Cocoon Data user account, so that the authenticator app can generate the appropriate authentication codes (for the 2nd authentication factor).
Re-configuring MFA for an organisation user account
While multi-factor authentication (MFA) is enabled on a user's account, the user might lose the ability to generate authentication codes for their 2nd authentication factor (explained in more detail above) due to any of the following reasons:
- The user deleted their Cocoon Data user account configuration from the authenticator application (app) installed on their mobile device.
- The time-limited link for configuring MFA expired before the user had a chance to complete the MFA configuration process. This is the link contained in the email notification informing the user that MFA has been enabled on their account.
- The user lost their mobile device. The user will require a replacement device in order to continue signing in through the Cocoon Data Sign-in page with MFA enabled on their account.
If one of these scenarios occurs, the user will no longer be able to sign in through the Cocoon Data Sign-in page. The user may likely send you or any other Organisation administrator an email message about one of these scenarios having occurred (via 'contact your administrator' feature on the Authentication code request page as they attempt to sign in through the Cocoon Data Sign-in page).
Therefore, to resolve this situation, the user requires MFA to be re-configured (aka re-seeded) for their account.
To re-configure MFA on a Cocoon Data user account in your organisation:
- Ensure you are signed in to Organisation Administration.
- Click the Users option on the left of the Organisation Administration interface to open the Users page.
- Find the user/s whose account is to be re-configured for MFA.
- Click the Re-seed button (in the Re-seed column) of the relevant user/s to re-configure MFA for their account.
Each user with MFA re-configured in this manner is sent an email notification informing them that MFA has been enabled for their account, similar to the email notification they received when MFA was originally enabled on their account. This email message contains a new time-limited link, leading to step-by-step instructions for the user to:
- (Re-)configure their mobile device with the appropriate authenticator app (should the user need to conduct this step again).
- (Re-)configure the authenticator app (once installed) with their Cocoon Data user account, which allows the authenticator app to generate the appropriate authentication codes for the 2nd authentication factor.
Configuring 'Users' page columns for organisation users
By default, all columns on the Users page are visible. With the exception of the Email column (which is always shown), if there are other columns whose visibility is not required when administering users on your organisation, then these columns can be selectively hidden from the Users page.
To hide one or more columns from the 'Users' page, or make these columns visible again:
- Ensure you are signed in to Organisation Administration.
- Click the Users option on the left of the Organisation Administration interface to open the Users page.
- Click the Select Columns drop-down and clear the check boxes next to the column names to be hidden. Conversely, select the check boxes next to the column names to be made visible again.