To access secure content, you can:
Viewing/printing/downloading your own content
To view/print/download/decrypt securely stored content that you own:
- Access the
SafeShare folder for your organisation.
- Within the
My Secured Files subfolder, locate the file/s or folder/s whose content you wish to view/print/download/decrypt.
- Do one of the following based on the action to be performed:
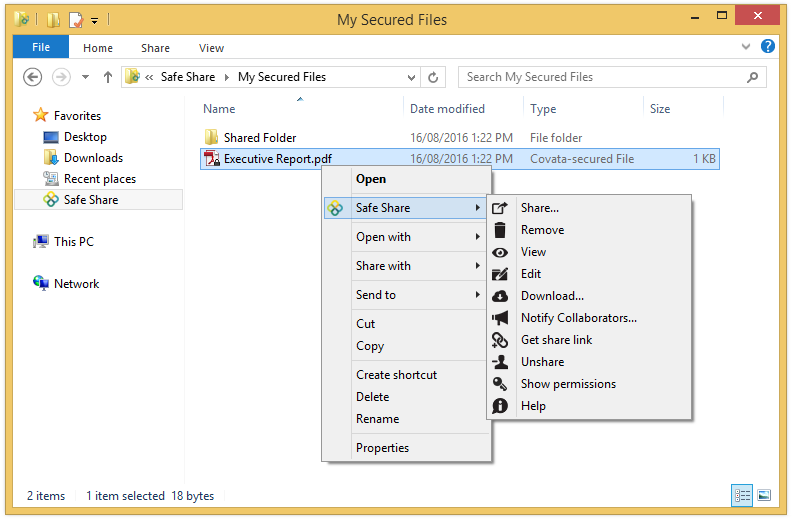
- To begin viewing/printing one or more of your own secure file/s, select and right-click on the file/s and choose SafeShare > View. A separate SafeShare Content Viewer window opens for each viewable file of your selected content.
Notes:
- If one of the files you selected is not viewable, a message is shown indicating that the file's type is not supported by the SafeShare Content Viewer. File types which are supported are equivalent to those in SafeShare for Web's content viewer.
- The View menu item is disabled if the selected items only consist of folders and/or non-viewable files. Although this menu option is available if one or more folders have been selected in addition to viewable files, any content within these folders is ignored (and not opened in the SafeShare Content Viewer).
- To begin downloading/decrypting your own secure content, either:
-
Select the item/s and drag&drop/copy/move them to a location outside the
SafeShare folder; for example, dragging and dropping them to your desktop:

Note: Regardless of whether you copy or move items from My Secured Files, the secured items will remain in the My Secured Files subfolder.
OR
-
Alternatively, select and right-click on one or more file/s and/or folder/s and choose SafeShare > Download from the pop-up menu:
The Browse For Folder dialog box opens, prompting you to specify a location where your selected content will be download.
SafeShare for Windows downloads the content (decrypting it on your computer) at the target location (e.g. your desktop).
Viewing/printing/downloading content (shared with you)
If files have been shared with you, then your ability to view and/or print + download/decrypt these files is based on the permissions that were granted to you as a collaborator on these files. The content viewer is useful when the owner of a file (or a collaborator with Manage permissions on it) wants to share the file's content but not allow the content to be printed and downloaded.
To view/print/download/decrypt securely stored content which someone else has shared with you:
- Access the
SafeShare folder for your organisation.
- Within the
Shared With Me subfolder, identify/locate the folder of the Cocoon Data user who shared content with you.
Note: You can only download/decrypt a file within these types of folders if you were granted Download permissions (or greater permissions that grant the individual download permission) when the file (or one of its ancestral folders) was shared with you. If you do not have the individual download permission on a file, then you can only view its content.
- Within this other user's
Shared By ... folder, locate the file/s or folder/s whose content you wish to view/print/download/decrypt.
Note: To determine if you can view or print the content of a file or folder (i.e. by having the individual view or print permissions respectively on the item), right-click the item and choose SafeShare > Show permissions from the pop-up menu:
- Do one of the following based on the action to be performed:
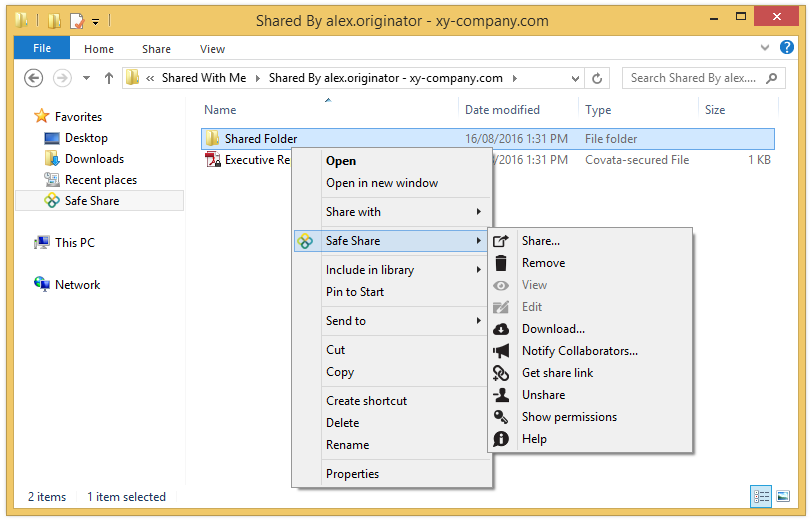
- To begin viewing/printing one or more secure file/s which someone else has securely shared with you, select and right-click on the file/s and choose SafeShare > View. A separate SafeShare Content Viewer window opens for each viewable item of your selected content.
Notes:
- If one of the files you selected is not viewable, a message is shown indicating that the file's type is not supported by the SafeShare Content Viewer. File types which are supported are equivalent to those in SafeShare for Web's content viewer.
- The View menu item is disabled if the selected item/s only consist of folders and/or non-viewable files. Although this menu option is available if one or more folders have been selected in addition to viewable files, any content within these folders is ignored (and not opened in the SafeShare Content Viewer).
- To begin downloading/decrypting secure content which someone else has securely shared with you, either:
-
Select the item/s and drag&drop/copy/move them to a location outside the
SafeShare folder - e.g. dragging and dropping them to your desktop:

Note: Regardless of whether you copy or move items from Shared With Me, the secured items will remain in the Shared With Me subfolder.
OR
-
Alternatively, select and right-click on one or more file/s and/or folder/s and choose a SafeShare > Download option from the pop-up menu:
The Browse For Folder dialog box opens, prompting you to specify a location where your selected content will be download.
SafeShare for Windows downloads the content (decrypting it on your computer) at the target location (e.g. your desktop).
Notes:
- If you downloaded a folder, either by dragging&dropping/copying/moving the folder to a location outside the
SafeShare folder (or via the SafeShare > Download right-click option), then all files within the folder (including its subfolders) are downloaded/decrypted, with the exception of subfolders on which you only have View permissions. If such a subfolder were to contain its own folder on which you had the individual download permission, then you would need to download this subfolder in a separate action.
- If files were moved out of any
SafeShare folder to a network drive location, then these files will only reappear in the source SafeShare folder following a subsequent SafeShare for Windows synchronization event (with remote storage managed by the Cocoon Data Platform).
- If SafeShare for Windows experiences delays in network communication, you may notice the following behavior:
- The encrypted files are temporarily copied to their target location.
- SafeShare for Windows decrypts these files from their temporary copies (created in the previous step) and saves them to the same location as their temporary copies.
- The temporary copies are deleted.
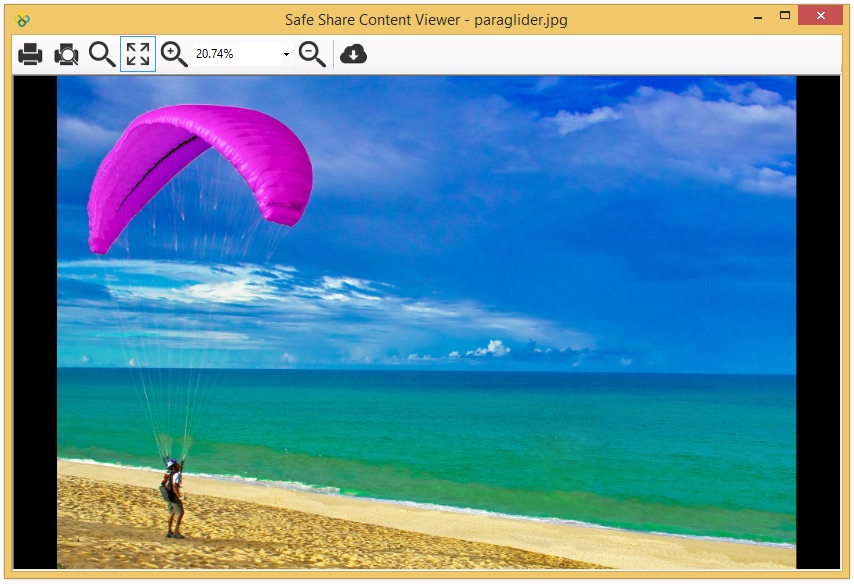
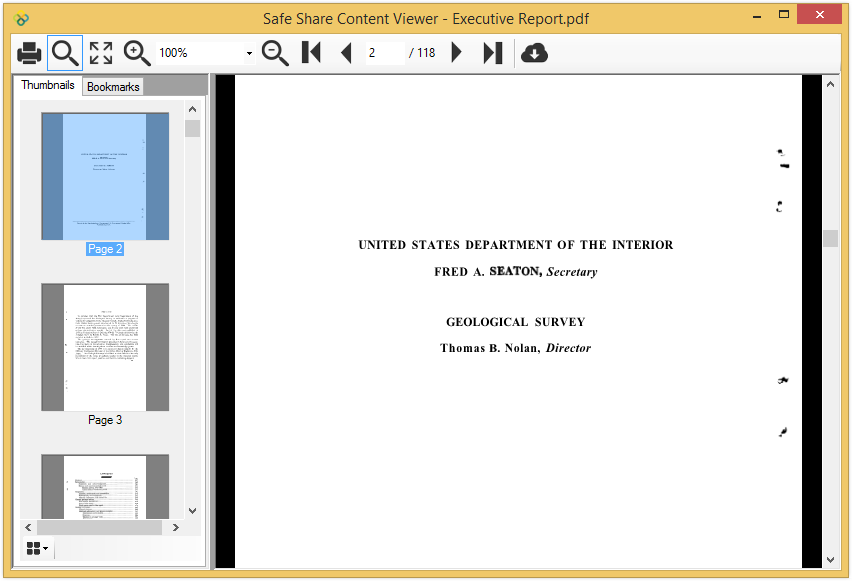
SafeShare for Windows' read-only content viewer
SafeShare for Windows' read-only content viewer (also known as the SafeShare Content Viewer within the application) and the content viewer of SafeShare for Web are equivalent features.
The SafeShare Content Viewer opens when you view your own or someone else's file with SafeShare for Windows.
SafeShare for Windows' content viewer for image files:
SafeShare for Windows' content viewer for document files:
Tips on using the SafeShare Content Viewer:
- Click the 'Print' icon
to print the file's content.
Note: This icon will not be available if you are a collaborator on the file being viewed (see Sharing secure content) and you were only granted View permissions on the file, which does not grant the individual print permission that allows you to print it directly from the content viewer.
- If you are viewing an image file, click the 'Print preview' icon
to view a preview of the file's content (before printing it).
Notes:
- Like the 'Print' icon, this icon will also not be available if you are a collaborator on the file being viewed and you were only granted View permissions.
- The print preview feature has its own functional icons for printing and zooming.
- Print previews can only be generated in portrait orientation. Landscape-oriented previews are not available through this feature.
- Click the 'Actual size'
and 'Fit to viewer'
icons zoom to the native size of the content or the size that fits the viewer, respectively.
- Click the 'Zoom In'
and 'Zoom Out'
icons to zoom in and out of the content view, respectively. The adjacent drop-down can also be used to select an appropriate zoom level.
- Click the 'Download' icon
on the content viewer to download the content of a file (belonging to you or someone else).
Note: This icon will not be available if you are a collaborator on the file being viewed and you were only granted View permissions on the file, which does not grant the individual download permission that allows you to download the file's content.
- If you are the owner of the file you are currently viewing, click the 'Share' icon
to open the 'Share' dialog box, which allows you to add new collaborators and/or modify existing collaborators (including their permissions) on this file.
Note: This icon will also be available if you are a collaborator on the file being viewed and you were granted Manage permissions on the file (which grants the individual share permission).
- If your content consists of multiple pages, you can navigate to different pages by:
- Clicking the 'Next Page'
and 'Previous Page'
icons to respectively move forward and back one page at a time.
- Clicking the 'First Page'
and 'Last Page'
icons to respectively jump/go to the first and last pages of content.
- Typing a page number in the 'Current Page' field (followed by the 'return/enter' key).
Editing files
To edit one or more securely stored files which you own (or someone else shared with you):
- Access the
SafeShare folder for your organisation.
- Locate the file you wish to edit either within:
- the
My Secured Files subfolder for a file you own, or
- another user's
Shared By ... folder (within the Shared With Me subfolder) for a file that someone else has shared with you.
- To begin editing:
-
A single file, double-click the file to open the file in its default Windows application.
OR
-
One or more files, select and right-click on the file/s and choose SafeShare > Edit from the pop-up menu:
Each of the selected files opens in its own default Windows application window.
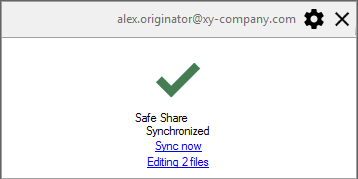
Regardless of the application that opens the file/s, this action immediately sets the file/s into 'edit mode', where the number of files in edit mode is indicated under the Sync now link on the application pane:
Notes:
- The default Windows application is the application currently configured in Windows to open the file (based on its file name extension).
This behavior is equivalent to downloading and decrypting the file from a SafeShare folder to another location (using one of the procedures above) and then double-clicking the file to open it. However, opening the file after downloading/decrypting it outside the SafeShare folder, does not set the file into 'edit mode'.
- Files in edit mode are stored by SafeShare for Windows in a local folder (managed by the application). Although these files are stored in a decrypted state, they are only intended to exist temporarily - see below for more information.
- Be aware that the default Windows application used to open your file may not be well-suited to editing this type of file, or this application may not be your preferred one for editing this file type. In such circumstances, either:
- Download and decrypt the file to another location outside its
SafeShare folder (using one of the procedures above) and then use Windows open the decrypted copy of this file in your application of choice.
- Use Windows' own operating system features to change the default Windows application used to open the type of file you wish to edit. Doing so will allow you to set and access these types of files in edit mode.
- If you edited the file outside its
SafeShare folder, you can create a new version of the file by simply uploading the file (using drag&drop/copy/move) back to its original SafeShare folder (which either you or another user own/s). See Managing file versions in the SafeShare for Web User's Guide for more information.
To access files in 'edit mode':
- Ensure that SafeShare for Windows has been started, you are signed in and if your Cocoon Data user account is a member of multiple organisations, that your current organisation is the one through which you want to access files in edit mode.
- Click the Editing N files link in the application pane, where 'N' represents the number of files you currently have open in edit mode, which opens the Files open for editing dialog box:
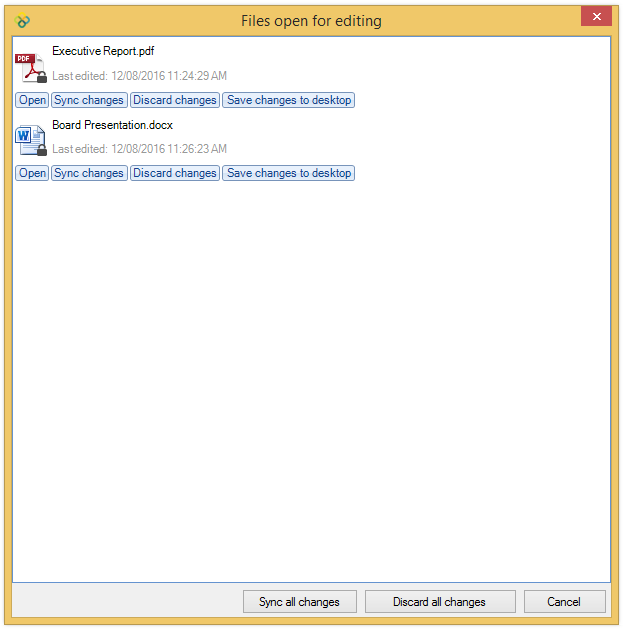
On this dialog box, you can click the following buttons on an individual file:
-
Open - to open this file in its default Windows application (for further editing).
Note: When saving any file in edit mode from its default Windows application, do so without changing the name and location of the file (which is a decrypted copy managed by SafeShare for Windows and is intended to exist only temporarily).
-
Sync changes - to save this file back to its original
SafeShare folder, which uploads and stores the last edited/locally saved changes you made to this file back to its original location in SafeShare, thereby creating a new version of this file. See Managing file versions in the SafeShare for Web User's Guide for more information.
Notes:
-
If the folder containing this file was moved since the file entered edit mode, then SafeShare for Windows keeps track of the location of this folder and will automatically save the file back to the correct
SafeShare folder. If, however, the folder containing this file was either removed or renamed (since the file entered edit mode), then SafeShare for Windows provides alternative options for handling your edited changes.
-
After clicking this button, this file entry is removed from the Files open for editing dialog box (and the locally decrypted copy of this file managed by SafeShare for Windows is removed).
-
Discard changes - to discard this file in edit mode.
Note: After clicking this button, this file entry is removed from the Files open for editing dialog box (and the locally decrypted copy of this file managed by SafeShare for Windows is removed). Be aware that you will lose any changes you made to this file since it entered edit mode.
-
Save changes to desktop - to save the last edited/locally saved changes you made to this file to the Windows desktop. After clicking this button, however, the locally decrypted copy of this file managed by SafeShare for Windows remains unaltered.
You can also click the following buttons on this dialog box:
-
Sync all changes - to perform the same function as the Sync changes button (above) but for all files in edit mode listed on this dialog box.
-
Discard all changes - to perform the same function as the Discard changes button (above) but for all files in edit mode listed on this dialog box.