|
SafeShare for Windows User's Guide
|
|
SafeShare for Windows User's Guide
|
SafeShare for Windows automatically starts when Windows boots up or restarts.
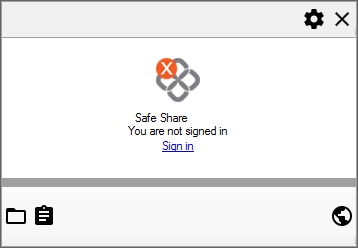
After starting, SafeShare for Windows may automatically prompt you to sign in with your Cocoon Data user account by opening the 'Sign in' dialog box, which would normally appear if you had never signed in to the application or you had signed out from a previous SafeShare for Windows session. If you had not switched users from a previous SafeShare for Windows session, then SafeShare for Windows retains your session when the application is restarted (and you will not be required to sign in).
If you need to sign in but the 'Sign in' dialog box is not visible, you can always sign in manually to access this dialog box.
If you happen to exit SafeShare for Windows or the application does not start after Windows boots up/restarts, you can manually start SafeShare for Windows.
To start SafeShare for Windows manually:
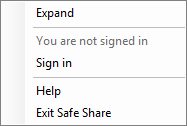
The SafeShare for Windows icon in the Windows taskbar notification area indicates:
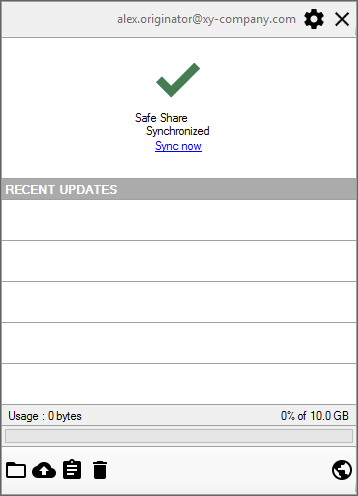
Once you are signed in, any Cocoon Data-secured files and folders associated with your Cocoon Data user account in remote storage (managed by the Cocoon Data Platform) are synchronized with your computer's file system and can be accessed locally through Windows Explorer.
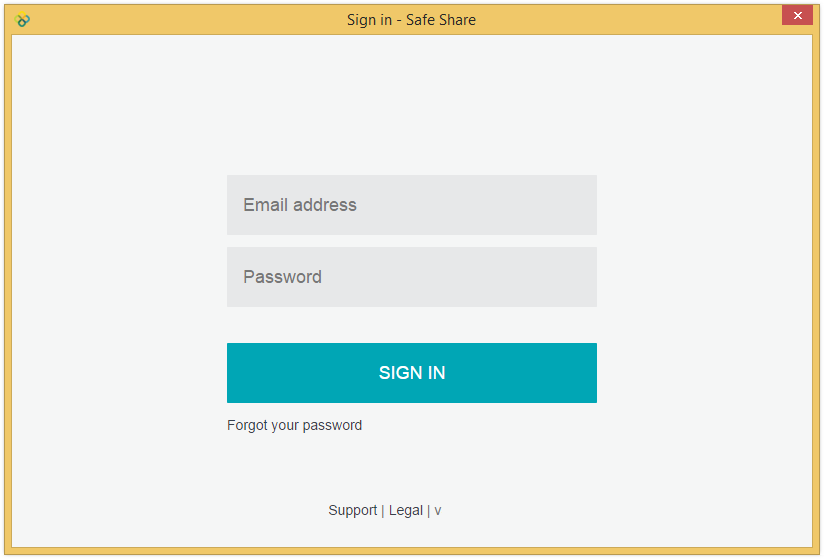
To sign in to SafeShare for Windows manually:
Notes:
- When signing in to SafeShare for Windows for the very first time after installing or upgrading the application, the Welcome to SafeShare for Windows web page is shown, containing a short tutorial of basic operation.
- If you signed in to SafeShare for Windows either for the first time or with a different Cocoon Data user account to the one used previously, then the following SafeShare folders are (re)created within the
SafeSharefolder (which in turn is contained within your Windows home folder):
My Secured FilesShared With Me- If the
My Secured Filesfolder does not appear, then your account does not have the Originator role. This role can be granted to your account by the Organisation administrator/s for your relevant organisation/s.- Each time you sign in to SafeShare for Windows as a different Cocoon Data user (on the same computer), the
My Secured FilesandShared With Mefolders of the previous Cocoon Data user are moved to the Recycle Bin and the contents of the newly recreatedMy Secured FilesandShared With Mefolders are updated to reflect the items in remote storage of this different Cocoon Data user.- Once you are signed in, SafeShare for Windows immediately begins synchronizing any files and folders in remote storage (associated with your Cocoon Data user account and accessible through SafeShare for Web), with those in the
My Secured FilesandShared With Mefolders. Cocoon Data-secured files within these folders appear with a size of 1 KB (or less) and have the extension.covl. However, when a file's encrypted content is initially downloaded (before local decryption) or encrypted locally before uploading, then a copy of this file with the extension.covmay be present. This file represents the file's locally encrypted data. However, SafeShare for Windows automatically deletes these files once the downloading/uploading process is complete.- A shortcut to the
My Secured Filessubfolder (above) as well as a shortcut to start the SafeShare for Windows application itself (called Cocoon Data SafeShare) are automatically created on your desktop. Be aware that if you initially signed in as a Cocoon Data user without the Originator role, then theMy Secured Filesshortcut is not created.
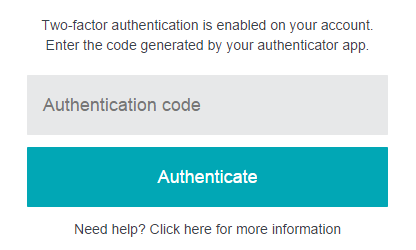
If either you or one of your Organisation administrators has configured your Cocoon Data user account with two-factor authentication (2FA), then you require a mobile device (i.e. an Android-, iPhone-, iPad-, iPod Touch- or Microsoft Windows-based one) running an authenticator application (from Google or Microsoft) to be able to sign in to SafeShare for Windows.
This authenticator application (aka authenticator app) that runs on your mobile device provides the 2nd authentication factor for your account, where your password is the 1st authentication factor.
To configure your mobile device with your Cocoon Data user account for 2FA:
SafeShare for Windows provides easy access to SafeShare for Web for better integration between these two products.
To access SafeShare for Web:
Notes about using this feature:
- SafeShare for Web is a complementary product to SafeShare for Windows. For example:
- SafeShare for Web allows you to manage your Cocoon Data user account through SafeShare for Windows and access some file/folder information features of this web application which are not accessible through Windows Explorer.
- Microsoft imposes a file and path size limit of 260 characters. Hence, if you need to work with secure content in a heavily-nested folder hierarchy, SafeShare for Web can be used to provide access to this content.
- If you are not signed in before accessing this feature, then the SafeShare Sign-in page is displayed. Be aware, however, that signing in through this page and SafeShare for Windows are two independent processes (with independent sessions).
- Your SafeShare for Windows installation may have been configured (typically by a systems administrator) to open the SafeShare Web window, which is an embedded web browser that is effectively a feature-restricted version of SafeShare for Web. For example:
- The Download feature in the SafeShare Web window is not supported. This feature is only supported natively (i.e. with a compatible web browser) through SafeShare for Web.
- When using the SafeShare Web window, it is not possible to navigate back and forward through pages. You can only navigate using SafeShare for Web's own navigation features.
To switch Cocoon Data users in SafeShare for Windows:
Note: Once you are signed out of SafeShare for Windows, any files or folders in the
My Secured FilesandShared With Mesubfolders of theSafeSharefolder on your computer will no longer be synchronized with items in remote storage managed by the Cocoon Data Platform.
You can exit SafeShare for Windows regardless of whether or not you are currently signed in to the application.
To exit SafeShare for Windows, either:
Note: To sign in to SafeShare for Windows again, restart the application and if you are not automatically signed in, sign in manually.