Storing and sharing content securely with SafeShare for Windows is performed directly through the SafeShare folder, which can be accessed conveniently from Windows Explorer (within your Windows home folder).
Accessing the 'SafeShare' folder
To access the SafeShare folder:
- Ensure that SafeShare for Windows has been started and that you are signed in.
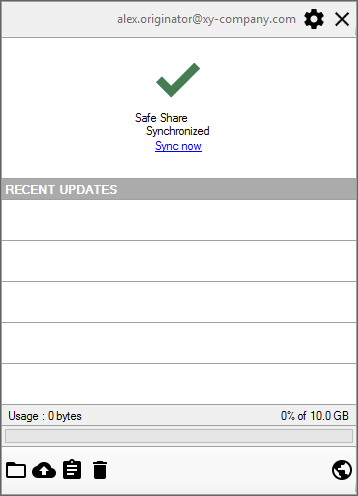
- Click the application's icon
in the taskbar notification area to open the SafeShare for Windows application pane (which appears at the lower-right of the screen):
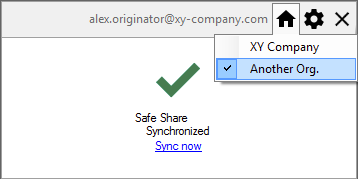
- If the 'Home/Organisation chooser' icon
is not indicated next to the 'Settings' icon
at the top-right of the application pane, skip to the next step. (This indicates that you are a member of only one organisation.)
Otherwise, your Cocoon Data user account is a member of multiple organisations on your Cocoon Data Platform instance and the name of your current organisation (in which your personally owned content will be stored/uploaded, shared, accessed or managed) is indicated by a tick in the drop-down, accessed by clicking the 'Organisation chooser' icon:
To select a different organisation (that you are a member of) in which to upload and store your content, choose the appropriate organisation via this drop-down icon.
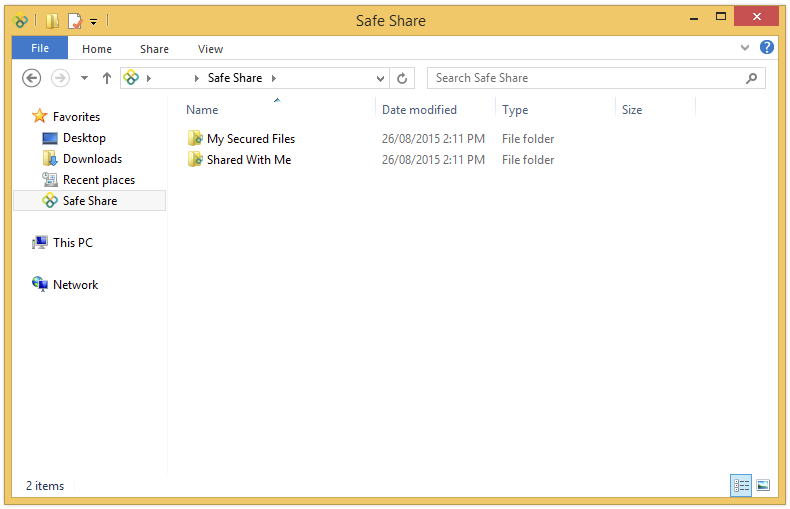
- Click the 'SafeShare Folder' icon
at the lower-left of the application pane and Windows Explorer opens at the
SafeShare folder located in your Windows home folder, showing its two subfolders (for your current organisation):
-
My Secured Files - contains all items that you own. Be aware that this folder does not appear if your account does not have the Originator role for your organisation.
Note: This folder represents the root location of your items area of the main SafeShare page in the SafeShare for Web application.
-
Shared With Me - contains all items that other Cocoon Data users have shared with you as a collaborator. The files/folders of each Cocoon Data user who shares content with you appears in its own folder within Shared With Me. The names of these folders have the format:
Shared By <local-part-of-email-address> - <domain-part-of-email-address>
Notes:
- After successfully signing in, SafeShare for Windows begins synchronizing any files and folders (in your current organisation) that:
- Have recently been modified in remote storage through your Cocoon Data user account (using any other SafeShare application), with those inside your local
My Secured Files folder.
- Other Cocoon Data users have recently shared with you, with those inside your local
Shared With Me folder.
- If any third-party applications operate on your computer which are configured to make a copy of encrypted content within the
SafeShare folder for storage elsewhere (e.g. backup applications), then this may result in decrypted copies of this content being stored by such applications in their target locations. Bear in mind that SafeShare for Windows automatically synchronizes and stores its encrypted content (within the SafeShare folder) in remote storage. Therefore, if you do not wish other copies of this content (in decrypted form) to be generated by any third-party applications, ensure that these applications have been configured to avoid copying/backing up content from the SafeShare folders.
Changing organisations
-
When the top-right of the application pane (accessed by clicking the SafeShare for Windows icon
after signing in) indicates the 'Home/Organisation chooser' icon
, then your Cocoon Data user account is a member of multiple organisations on your Cocoon Data Platform instance.
The name of your current organisation (in which your content can be stored/uploaded, shared, accessed and managed) is indicated by a tick in the drop-down, accessed by clicking the 'Organisation chooser' icon:
To select a different organisation (you are a member of), choose the appropriate organisation via this drop-down icon.
Note: Changing your home/default organisation through SafeShare for Web (i.e. via the 'Organisations' section of the My Account feature), does not change or affect your current/selected organisation when SafeShare for Windows starts and you are signed in. This separation of functionality is designed to prevent SafeShare for Windows synchronizing potentially large numbers of files and impacting Windows operating system performance (as a result of an organisation change), without you explicitly changing organisations from within SafeShare for Windows itself. The only time when your home/default organisation (specified through SafeShare for Web) affects the organisation selected in SafeShare for Windows is when your Cocoon Data user account is used to sign in to SafeShare for Windows for the first time.
Uploading and storing personally owned content
This procedure explains how to begin uploading and storing your own content managed by the Cocoon Data Platform.
Tip: You can also store personally owned content securely and share it (described below) in a single action. See Uploading, storing and sharing content 'in one go' for more information.
To upload and store personally owned content securely:
- Access the
SafeShare folder for your organisation.
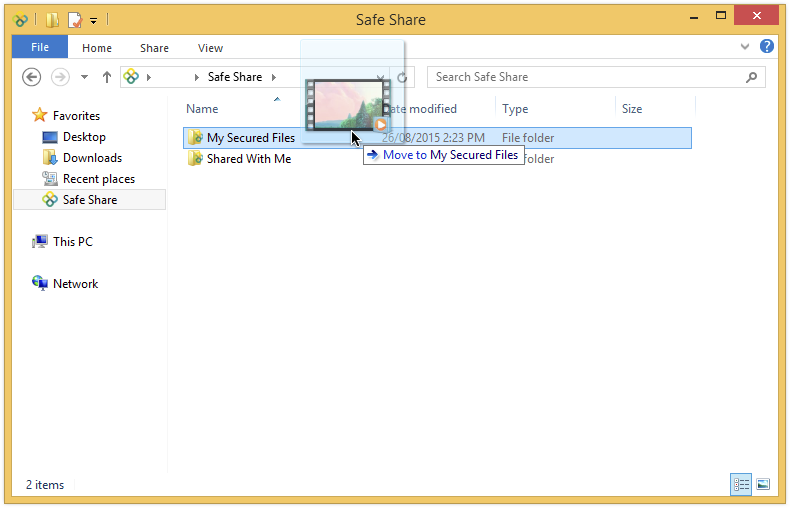
- Select one or more file/s and/or folder/s on your computer and copy or move them into:
-
the
My Secured Files subfolder (as you would usually do so with Windows Explorer), or
-
any other subfolder within
My Secured Files.
For example, drag and drop your item/s directly into the My Secured Files subfolder:
Your items are encrypted locally within the My Secured Files folder by SafeShare for Windows and the secured items are then uploaded to remote storage managed by the Cocoon Data Platform. Regardless of whether you copied or moved items, your original source content may remain in its original location. See Notes below for more information about this behavior.
Tips:
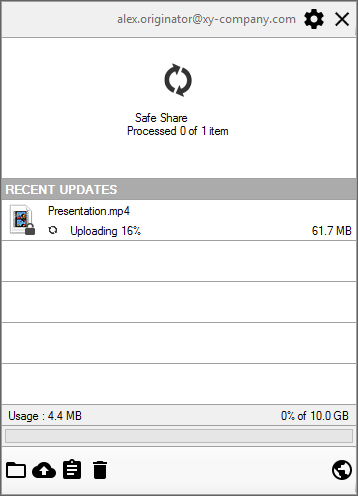
-
The application pane's RECENT UPDATES section shows the last (set of) file/s to be encrypted/uploaded (in reverse chronological order). Clicking a file in this section opens Windows Explorer to the
My Secured Files subfolder which contains that file. The RECENT UPDATES section also shows the last (set of) file/s to be decrypted/downloaded or even accessed (i.e. viewed).
-
You can also upload and store one or more file/s and/or folder/s securely by selecting the item/s on your computer and:
-
Moving the item/s directly into the
SafeShare folder. Doing this is the same as either copying or moving the item/s directly into the My Secured Files folder. Be aware that copying items directly into the SafeShare folder itself is not supported.
-
Copying or moving the item/s into the
My Secured Files shortcut (i.e. to the My Secured Files folder) on your desktop (if this shortcut is available).
-
You can also upload and store one or more file/s securely by clicking the application pane's 'Choose files to be secured' icon
that opens the Choose files to be secured dialog box, from which you can select one or more file/s from a given location, then click the Open button to upload the file/s directly to the
My Secured Files folder. Be aware that unlike the drag&drop/copy/move mechanisms described above, this feature also supports uploading and storing files via their Windows shortcuts.
-
If you attempt to upload and store a file whose name matches that of an existing file at a given location, SafeShare for Windows indicates a File exists - Adding new version taskbar notification and then automatically begins uploading a new version of that file. Currently, other versions of a file can only be accessed and managed in SafeShare for Web. See Managing file versions in the SafeShare for Web User's Guide for more information.
-
At any time, you can:
-
Click the application pane's 'Minimize' icon
to hide the application pane.
-
Click the SafeShare for Windows icon
in the taskbar notification area to toggle between (re-)opening and hiding the application pane.
Notes:
-
The maximum file size which can be uploaded depends on properties configured on the Cocoon Data Platform. This size can be provided by your Cocoon Data Platform's SafeShare administrators. Be aware, however, that SafeShare for Windows has its own default maximum file size upload limit of 20 GB, which both overrides and is much lower than the limit imposed by the Cocoon Data Platform. Nevertheless, this default value can be overridden by a Windows registry setting.
-
If copying (not moving) a large file (typically of several hundred MB in size), SafeShare for Windows may report 'Cannot encrypt - Windows prevented access to the item.' in a notification. However, SafeShare for Windows will automatically begin encrypting this content after the copying process is completed. Therefore in these scenarios, this notification can be ignored.
-
SafeShare for Windows does not support the copying of files between any folders within the
SafeShare folder - even between folders within My Secured Files. Any copied files are automatically deleted following the next synchronization event (with remote storage managed by the Cocoon Data Platform).
-
If you are curious to know how your source content is handled by SafeShare for Windows, then the following table explains how the application processes your items when they are either copied or moved into the
My Secured Files subfolder:
| Action | Source content is from a local drive (e.g. C:) | Source content is from a network drive |
Moving
Cutting and pasting selected items into My Secured Files, using
-
the relevant right-click context menu items, or
-
'Ctrl-X/Ctrl-V' keyboard shortcuts.
| This action can also be performed by simply dragging and dropping selected items into My Secured Files.
How your items are processed:
-
Any folders and folder structures amongst your selected items are recreated within the
My Secured Files folder.
-
All files amongst your selected items are encrypted to separate Covata-secured files with
.covl extensions and saved to My Secured Files (within the same folder structures that match those of your selected items).
Note: The source content remains in its original location. In some instances, you may need to refresh Windows Explorer to see the source content reappear.
| This action can also be performed by holding the 'Shift' key whilst dragging and dropping selected items into My Secured Files.
How your items are processed:
-
Your selected items are first copied to
My Secured Files, including any folders and folder structures.
-
These copied files (in
My Secured Files) are encrypted to separate Covata-secured files with .covl extensions, which are then saved to the same locations (i.e. as the copied files they were created from).
-
The copied/unencrypted files in
My Secured Files (from step 1 above), are moved to the recycle bin.
Note: The source content is deleted from its original location.
|
Copying
Copying and pasting selected items into My Secured Files, using
-
the relevant right-click context menu items, or
-
'Ctrl-C/Ctrl-V' keyboard shortcuts.
| This action can also be performed by holding the 'Ctrl' key whilst dragging and dropping selected items into My Secured Files. | This action can also be performed by simply dragging and dropping selected items into My Secured Files. |
How your items are processed:
The processing behavior is identical to moving selected items from a network drive (above right). However, the source content remains in its original location.
|
Sharing secure content
This procedure explains how to begin sharing either:
- personally owned secure content (which you or someone else had previously uploaded) with other people, or
- secure content (owned by another Cocoon Data user) that has been shared with you with Manage permissions,
as well as how to modify the people who can access this content (known as 'collaborators') and/or these collaborators' access permissions to this content.
Notes:
To share securely stored content with other people (or modify any existing sharing on this content):
- Access the
SafeShare folder for your organisation.
- To share:
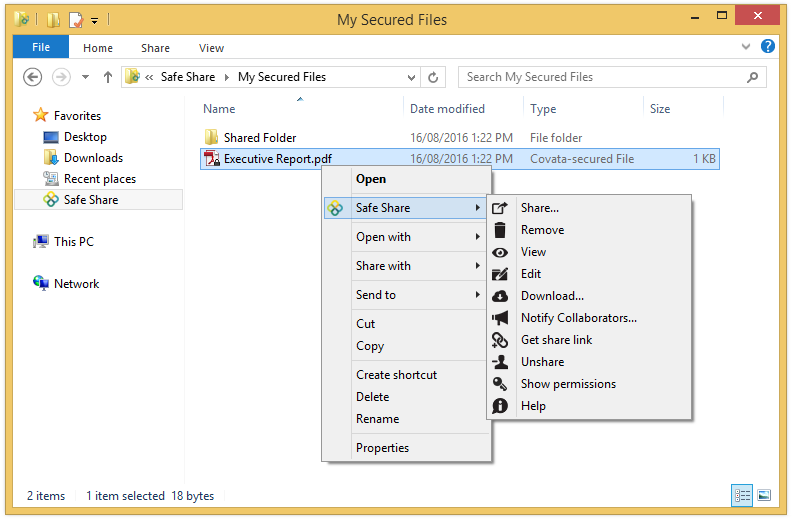
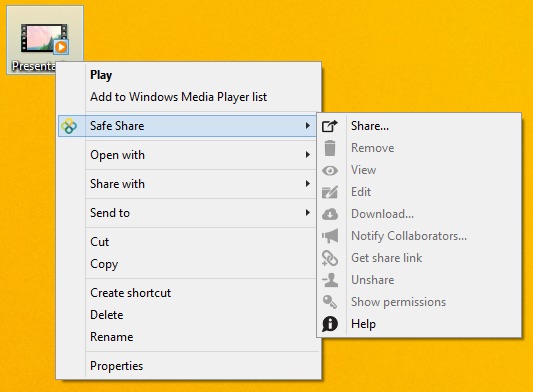
- Personally owned content, then within the
My Secured Files subfolder, right-click on the file or folder to either share with one or more other people or modify existing collaborators and choose SafeShare > Share from the pop-up menu (to open the SafeShare dialog box):
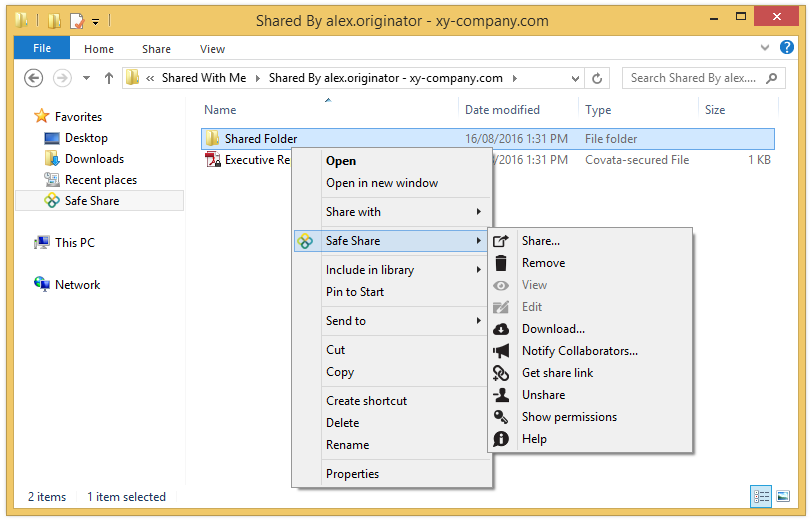
- Content owned by another Cocoon Data user, then within this other user's
Shared By ... folder (inside the Shared With Me subfolder), right-click the file or folder (on which you have Manage permissions) to either share with more people or modify existing collaborators and choose SafeShare > Share from the pop-up menu (to open the SafeShare dialog box):
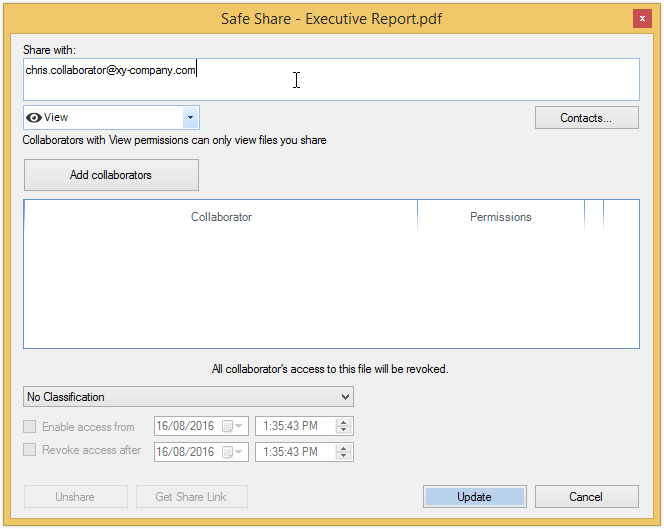
- In the SafeShare dialog box, do one of the following:
- To share the item with someone, type the email address of this person (i.e. the 'collaborator') into the Share with text box and skip to the next step on selecting permissions for this collaborator. (Before doing so, read the Notes about ... below for important information about the SafeShare dialog box's functionality.)
Notes about the 'SafeShare' dialog box:
-
If the email address you are typing autocompletes in a drop-down list for selection before you have completed typing it out, then:
-
you have either:
-
already used that email address when previously sharing an item (which automatically added the address to your list of contacts - see Managing your contacts for more information)
or
-
manually added that email address to your list of contacts.
-
an Organisation administrator (of your current organisation) has enabled the address book feature, which autocompletes the email address of any member of your current organisation. For more information about this SafeShare Organisation Administration feature, see Configuring SafeShare Organisation Administration properties in the Organisation Administrator's Guide.
-
You can also add one or more collaborators from the 'Contacts' dialog box.
-
If you are sharing a folder, then a slightly different dialog box will be shown. (These differences are explained below.)
- To modify the permissions of an existing collaborator on the item, locate the existing collaborator's email address in the collaborator list (on this dialog box) and skip to the next step on selecting permissions for this collaborator.
- To remove existing collaborators from the item, locate the existing collaborators email addresses in the collaborator list (on this dialog box) and click the x button associated with each email address. If you need to add more collaborators to the item or modify existing collaborators' permissions, follow the appropriate action/option in this step (above). Otherwise, once you have completed removing collaborators from this item, skip to step 7 (below).
- Select one of the following permissions (each of which is also known as a 'permission set', since each one consists of individual permissions) from the adjacent drop-down to define the extent of access that this collaborator has to this item:
-
View - grants the individual permission to view this file (from SafeShare for Windows' read-only content viewer - also known as the SafeShare Content Viewer) or if the item is a folder * , the same individual permission to view any files contained within this folder (and its subfolders) is also granted.
Tips:
-
Download - grants the individual permissions to view, print (also from the SafeShare Content Viewer) and download this file or if the item is a folder * , these same individual permissions to perform these actions on any files contained within this folder (and its subfolders) are also granted.
Tip: Granting Download permissions on an item also allows the item's content to be printed from the equivalent read-only content viewers of SafeShare for Web, SafeShare for iOS and SafeShare for Android.
-
Upload - grants the individual permissions to view, print and download existing files, as well as upload new versions of files. If the item is a folder * :
-
these same individual permissions are also granted to any files and subfolders contained within this folder, and
-
the individual permissions to upload new files and their versions and create new subfolders (within this folder) are granted.
-
Modify - grants the individual permissions to view, print, download, rename and remove this file. If the item is a folder * :
-
these same individual permissions are also granted to any files and subfolders contained within this folder,
-
the individual rename and remove permissions are granted to this folder itself,
-
the individual permissions to upload new files and their versions, create new subfolders and remove existing subfolders (within this folder) are granted,
-
the individual permission to move either a file or a subfolder to another subfolder (all contained within this folder) are also granted, and
-
permission to edit and/or save/upload new versions of files, as well as access a file's other versions through SafeShare for Web are also granted, where any other version of a file can be viewed, printed, downloaded or set as Active.
-
Manage - grants the individual permissions to view, print, download, rename, share and remove this file. If the item is a folder * :
-
these same individual permissions are also granted to any files and subfolders contained within this folder,
-
the individual rename, share and remove permissions are granted to this folder itself,
-
the individual permissions to upload new files and their versions, create new subfolders and remove existing subfolders (within this folder) are granted,
-
the individual permission to move either a file or a subfolder to another subfolder (all contained within this folder) are also granted, and
-
permission to edit and/or save/upload new versions of files, as well as access a file's other versions through SafeShare for Web are also granted, where any other version of a file can be viewed, printed, downloaded or set as Active.
Be aware that if your Cocoon Data user account is listed on the SafeShare dialog box as a collaborator (with Manage permissions) and you demote these permissions to something else, then upon clicking Share/Update at the end of this procedure, you will lose the ability to subsequently access this dialog box for this content. To regain this access, ask the owner of the content (or another collaborator on it with Manage permissions) to change your permissions on this content to Manage again.
If you are not adding a new collaborator to the item, skip to step 6 (below).
* Note: When sharing a folder:
- The collaborators and their permissions (to access content within the folder) are implicitly propagated (i.e. applied) to all items contained within the folder.
- If collaborators and/or their permissions on a subfolder (within this folder) are modified, then these modifications are explicitly set on this subfolder, which in turn are implicitly propagated down through this subfolder's item hierarchy.
- The permissions of a collaborator set explicitly on this subfolder override any permissions which this collaborator may have inherited implicitly from an ancestral folder.
- If the collaborator's email address does not appear in the collaborator list (on this dialog box), click the Add collaborators button (or if selecting the default View permissions, simply type 'Enter'/'Return' after specifying the email address) and the collaborator's email address + their selected permissions are added to the collaborator list:
Tip: You can also specify multiple email addresses/collaborators in the Share with text box to add 'in one go' by doing either of the following:
-
Typing a comma (,) character after each email address, which completes the current email address and allows you to specify more email addresses in this text box; all these email address are added to the collaborator list when the Add collaborators button is clicked.
-
Copying and pasting a comma delimited 'string' of collaborators' email addresses into its text field (without spaces); SafeShare for Windows automatically identifies each email address (in this text box), all of which are added to the collaborator list when the Add collaborators button is clicked.
Be aware that with either of these methods, the currently selected permission in the adjacent 'permissions' drop-down (immediately under the Share with text box) is used for all collaborators specified.
- To either add more collaborators to this list or modify the permissions of other existing collaborators on the item, repeat from step 3 (above). Otherwise, continue on...
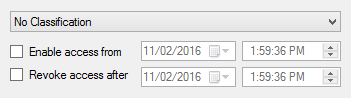
- ( Optional + only available when sharing a file and if your Organisation administrator has configured classifications for your current organisation ) Choose a predefined classification from the 'classification' drop-down list, where No Classification is chosen by default. Classifications allow you to restrict the ability to share files to specific groups of Cocoon Data users.
Notes:
-
If your organisation's policy requires you to assign a specific classification when sharing a file, then choose the appropriate classification for the type of content you are sharing. For example, (one of) your Organisation administrator/s may have configured the classifications: Confidential, Restricted/Protected and Unclassified for your current organisation. The default No Classification option (which does not apply any classification) is also available as a choice when sharing the file.
-
For more information about classifications and groups, refer to Managing classifications / groups in the Organisation Administrator's Guide.
Tip: If you only need to modify the classification on a file, you can do so quickly (without having to open the Share dialog box) by:
- Selecting the file from the items area of the main SafeShare page.
- In the File Details section of the Details tab to the right of the items area, choosing the required classification from the Classification drop-down. Be aware that if any existing collaborators on the file are not associated with your chosen classification (via group membership defined by an Organisation administrator), then you will receive a warning to this effect and be prevented from choosing that classification.
- ( Optional and also only available when sharing a file ) Define when your file can be accessed, by:
-
Selecting the Enable access from check box and in the fields to the right, specifying the date and time when your collaborators can begin accessing your file. For immediate availability, leave this check box cleared.
-
Selecting the Revoke access after check box and in the fields to the right, specifying the date and time when your collaborators' access to your file ceases. For no expiration, leave this check box cleared.
- Click Share/Update or type 'Enter'/'Return' to complete sharing your item with your collaborators and close the SafeShare dialog box. An email notification is sent to all newly added collaborators that were specified on this dialog box.
Notes:
-
If you receive the following warning messages, which prevents you from sharing your item:
-
'The whitelist feature is not permitting you to share this item with one or more people. Please contact your administrator.' - Your Organisation administrator has enabled your organisation's user whitelist feature, which restricts the people (who have permission to access your organisation on the Cocoon Data Platform) to those whose email addresses (or email address domains) have been added to this whitelist feature. You may need to contact your Organisation administrator to clarify which peoples' email addresses and domains have been 'whitelisted' to ensure that when sharing an item (above), any non-whitelisted collaborators have either been removed or have not been added to your list of collaborators.
-
'The following user/s do/es not have access to CLASSIFICATION files:' (where 'CLASSIFICATION' is the name of the classification you selected above) - Your Organisation administrator has not permitted the users listed in the warning message with access to content shared with the applied CLASSIFICATION. Either remove these users who are not permitted to access content shared with the applied CLASSIFICATION, or choose a different classification.
In either case, click the message itself to return to the SafeShare dialog box.
-
For more information about the user whitelist and classifications (+ groups), please refer to the Organisation Administrator's Guide.
-
It is also possible to 'unshare' your secure content (i.e. remove collaborators from this content). For more information, see Unsharing secure content.
Additional tips and notes:
- To share multiple files with one or more people, create a folder within the
My Secured Files subfolder and share this new folder with one or more collaborators using this procedure (above). Any items that you or a collaborator (with Upload, Modify or Manage permissions on this folder) copy or move to this folder (from outside the SafeShare folder area) are immediately shared with all current collaborators on the folder. If, however, any collaborators and their permissions are modified on any item in this folder (i.e. any subfolder or file contained within of this folder), then these modifications will override these collaborators and their permissions which had been set on this (i.e. ancestral) folder. Be aware that unlike the folder's owner, collaborators (with Upload, Modify or Manage permissions on the folder) will see the folder located within their Shared With Me subfolder.
- You can send a SafeShare email notification to all (or a subset of) current collaborators on your item. To do this:
- Access the
SafeShare folder and within the My Secured Files subfolder for your current organisation, right-click the item and choose SafeShare > Notify Collaborators from the pop-up menu, which opens the Notify Collaborators dialog box.
Notes:
- In this dialog box, clear the Notify all collaborators check box (i.e. the default option) to be able to select individual collaborators (via their email addresses) to send your SafeShare email notification to.
- You can also send a SafeShare email notification to (a subset of) collaborators on an item owned by another Cocoon Data user who has shared this item with you (with Upload, Modify or Manage permissions). To do this, right-click the item (within this other user's
Shared By ... folder in Shared With Me) and choose the same pop-up menu option (SafeShare > Notify Collaborators).
- In these situations (as a collaborator on an item), the item's owner is also listed as a 'collaborator'.
- If you only have View or Download permissions on an item, you can still use this SafeShare email notification feature. However, this notification can only be sent to the item's owner.
- Type an optional message in the Message (optional) field.
- Click the Send button to send an email notification to all selected collaborators. This notification contains a link to the item and instructions on how to access the item.
- You can obtain a URL to access your file or folder directly through SafeShare for Web, which you could then email or send via an (instant) messenger application to any collaborators you have shared the item with. To obtain this direct URL, either:
-
Access the
SafeShare folder.
-
Within the
My Secured Files subfolder for your current organisation, right-click the item and choose SafeShare > Get share link from the pop-up menu.
OR
-
Open the SafeShare dialog box on this item (described at the start of this procedure above).
-
On the SafeShare dialog box, click the Get Share Link button to copy this link to the clipboard. This button is only available when at least one collaborator is on the item.
For file formats supported by the content viewer of any SafeShare application, this URL opens the item within content viewer of the SafeShare for Web as opposed to the main SafeShare page that lists the item.
Note: You can also obtain a URL to access an item owned by another Cocoon Data user who has shared this item with you (with Manage permissions), by following either of these processes but on an item within this other user's Shared By ... folder in Shared With Me.
- If you share an item with one or more collaborators and that item is contained within a folder which has not been shared with them, then when these collaborators sign in to:
- SafeShare for Windows, they can access the item from the root of your Cocoon Data user account's
Shared By... subfolder (contained within their Shared With Me subfolder). For more information about Shared By... subfolders, see Viewing/printing/downloading content (shared with you).
- SafeShare for Web, they can access the item from the root location of their main SafeShare page.
- If you move any items from one subfolder to another within
My Secured Files, then these items become accessible to any additional other collaborators with whom the target subfolder has already been explicitly shared. This accessibility also includes other collaborators set explicitly on any ancestral folders (within the My Secured Files folder) who will then have implicit access to these moved items in their new target location. Each of these other collaborator's access to these moved items depends on their permissions applied to their relevant ancestral folder. Be aware, however, that such collaborators do not receive email notifications for any items moved into a folder they can already access.
Uploading, storing and sharing content 'in one go'
To securely upload, store and share your own content with other people in a single action (from anywhere accessible through Windows Explorer):
- Ensure that SafeShare for Windows has been started, you are signed in and if your Cocoon Data user account is a member of multiple organisations, that your current organisation is the one through which you want to upload and share this content.
- Right-click a file or folder on your desktop or elsewhere within Windows Explorer and choose SafeShare > Share from the pop-up menu:
SafeShare for Windows begins encrypting your item's content and uploads the encrypted content to remote storage, indicated by a notification in the application pane:
Notes:
- If you are not signed in, SafeShare for Windows prompts you to sign in by opening the 'Sign In' dialog box.
- If you are securely storing a large amount of data, the encryption process may take some time. Be aware that you can click the application pane's 'Minimize' icon
at any time to hide the application pane (with the encryption process continuing in the background).
- The maximum file size supported depends on a property configured on the Cocoon Data Platform. This property's value can be provided by your SafeShare administrator/s. SafeShare for Windows defines its own overriding default maximum file size of 20 GB, which can be overridden (for uploads only) by a Windows registry setting.
- Once the encryption process is completed, the SafeShare dialog box opens. Continue from step 3 of the 'Sharing secure content' procedure above.
Uploading content to share through another user's folder
If a Cocoon Data user who owns a folder has:
- shared this folder with you as a collaborator and
- granted you the Upload, Modify or Manage permissions (i.e. permission sets) to access this folder,
then you will be able to securely store content to share through this other Cocoon Data user's folder. Once this content is encrypted, it is uploaded to remote storage managed by the Cocoon Data Platform.
Any content you upload and store through this folder:
- implicitly inherits the same permissions you were granted on the folder,
- becomes available to other Cocoon Data users who are also collaborators on this folder and
- becomes the ownership of the user who shared the folder with you.
To determine if you have permission to store content in (i.e. upload content to) another user's folder (or modify/manage content within it):
- Access the
SafeShare folder for your organisation.
- Within the
Shared With Me subfolder, identify/locate the folder for this other Cocoon Data user who shared content with you.
- Within this other user's
Shared By ... folder, right-click on a subfolder and choose SafeShare > Show permissions from the pop-up menu:
A Permissions message box appears indicating the permission set and each of its individual permissions you have on this subfolder. On this subfolder, the:
- Upload permission set allows you to upload files (and new versions) to the folder, including any subfolders on which you also have the Upload permission set, as well as create within these folders.
- Modify permission set grants you all the same permissions on the folder and its contents that the Upload permission set does, as well as the ability to:
- rename and remove items contained within this folder, as well as the folder itself, including any subfolders on which you also have Modify permissions, and
- move files contained within this folder between subfolders on which you also have the Modify permission set.
- Manage permission set grants you all the same permissions on the folder that the Modify permission set does, as well as the ability to share the folder and any items contained within this folder on which you also have Manage permissions.
Identifying who is a collaborator on this other user's (i.e. the owner's) folder
As a collaborator with either the Upload or Manage permission sets on another Cocoon Data user's folder, you may wish to identify which other people are collaborators on this folder before you decide to upload and share content within this folder. To identify who all of these collaborators are:
- Access the
SafeShare folder for your organisation.
- Within the
Shared With Me subfolder, identify/locate the folder for this other Cocoon Data user who shared content with you.
- Within this other user's
Shared By ... folder, right-click on a subfolder and choose SafeShare > Notify Collaborators from the pop-up menu to open the Notify Collaborators dialog box.
The Choose collaborators to notify section of this dialog box lists all collaborators on this subfolder as well as its owner.
- Click Cancel to close this dialog box.
Alternatively, to identify all collaborators on another user's folder (including the permissions these collaborators have on this folder), use the SafeShare Web feature:
- Access SafeShare Web.
- Within SafeShare Web, locate and select the folder (of another user) that you have Upload or Manage permissions on. See Finding secure content and Uploading content to share through another user's folder in the SafeShare for Web User's Guide for more information.
Under the Sharing and Permissions section on the Details tab, all other Cocoon Data users who are currently collaborators on the folder (including the owner but excluding yourself) are shown, including their current permission sets.
To securely upload content to share through this other user's folder:
- Access the
SafeShare folder for your/the required organisation and identify the other Cocoon Data user's folder which you are a collaborator on and have permission to upload content to (described in the procedures above).
- Select one or more file/s and/or folder/s on your computer and copy or move them into this folder (as you would usually do so with Windows Explorer).
Your items are encrypted locally within this folder by SafeShare for Windows and the secured items are then uploaded to remote storage managed by the Cocoon Data Platform.
Notes:
- The remote storage space allocated to the Cocoon Data user whose folder you copied/moved your content to, is used to store this content upon upload.
- Therefore, your uploaded content will appear in the owner's
My Secured Files folder when the owner next signs in to SafeShare for Windows.
- All collaborators on this folder (as specified by its owner) will gain access to the content you uploaded (based on each collaborator's permissions on this folder).
- If you attempt to upload and store a file whose name matches that of an existing file (you have Modify or Manage permissions on) at a given location, SafeShare for Windows indicates a File exists - Adding new version taskbar notification and then automatically begins uploading a new version of that file. Currently, other versions of a file can only be accessed and managed in SafeShare for Web. See Managing file versions in the SafeShare for Web User's Guide for more information.
- If you receive the message 'Action could not be performed - The item already exists in the folder or remote storage.', then at least one item with the same name already exists in this user's folder. However, you will not be able to see these items as you are not a collaborator on them for one of the following reasons:
Additional tip: As a collaborator on an item (including content you have uploaded to another user's folder), you can send a SafeShare email notification to all (or a subset of) other collaborators currently on the item (including the item's owner). To do this:
- Access the
SafeShare folder for your/the required organisation and within the Shared By ... subfolder for this other user (inside the Shared With Me folder), right-click the item and choose SafeShare > Notify Collaborators from the pop-up menu, which opens the Notify Collaborators dialog box.
Note: In this dialog box, clear the Notify all collaborators check box (i.e. the default option) to be able to select individual collaborators (via their email addresses) to send your SafeShare email notification to.
- Type an optional message in the Message (optional) field.
- Click the Send button to send an email notification to all selected collaborators (along with the optional message). This notification contains a link to the item and instructions on how to access the item.